
Are you a teacher blogger? Or do your students blog? We’re guessing one of your biggest obstacles to doing as much on your blog as you would like is time.
When we surveyed our Edublogs community about their biggest obstacle to blogging, the results were clear. Time is a barrier for everyone!
This post outlines a simple approach that will see you develop consistency with your blogging and publish one blog post a week.
Whether you’re a teacher or a student, you can use this plan to reach your blogging goals, without sitting at your computer for hours on end.
Sound good? Let’s take a look!
Blog In Your Head
Before we dive into our weekly outline, consider using the time you’re not at your computer to do something productive and ponder blogging ideas.
Blog in your head? Really?
You might think you can only blog when you’re sitting at a device but, you can in fact blog anywhere at any time.
Many regular bloggers note that even when they’re not at their computer, they’re thinking of ideas for posts, or even coming up with phrases or layouts.
To reach your blogging goals, try to make a conscious effort to put some thought into your blog during your downtime: driving, standing in line at the store, folding laundry and so on.
Using your “white space” well can nourish your creativity and imagination!
In the classroom setting, try taking your class for a 10 minute walk around the school grounds to give them time to think. Maybe it can help them with idea generation.
Then write down your ideas…
We know how easy it is for thoughts to come and go, so make sure you have a strategy for getting those great ideas jotted down. This might be on a Google Doc/Sheet, in a notebook, or in a Note on your phone.
Tip: Most professional bloggers have some sort of editorial calendar. Often this is just a calendar in Google Sheets where you plan out your blog titles and dates. This could really help you stay organized and prioritize your blog.
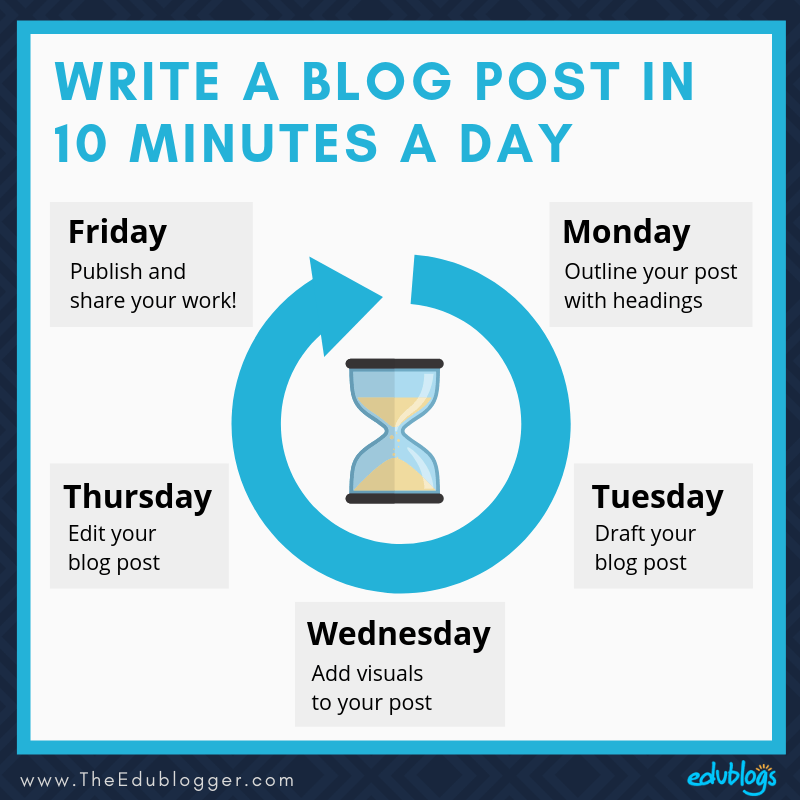
The Weekly Blogging Plan
Here’s our 5 day blogging plan that will see you get a blog post written every week using small blocks of time; ideally 10 minute blocks!
Obviously, feel free to adjust the actual days to what suits you best, or even spread this process out over two weeks if that publishing schedule suits you better.
Monday: Outline Your Post With Headings
Hopefully, on Monday you will already have an idea for a blog post. It might be something that’s been brewing in your head or you might grab it off your running list of ideas/editorial calendar.
Today is all about creating an outline. You should be able to get this done in 10 minutes.
Two Simple Steps To Follow
1) The first step is opening up a new blog post. Write a working title. Don’t worry too much about it as you might think of a better idea later.
2) Next, you’ll use headings to outline your post.
Here are some things to remember about headings:
- Start with Heading 2 as Heading 1 is your title.
- If you put sub-headings under Heading 2, they’ll be Heading 3.
- Any sub-headings under that will be Heading 4.
- You don’t want to skip levels.
To make headings in your classic editor, just highlight your text and look for the ‘Paragraph’ option in the toolbar. Clicking on it will bring up a menu of the heading tags and you click on the level you’re after.

More Headings Tips:
- Use a number of headings to break up your text.
- Often, readers will only scan your page and just look at your headings. So make them informative. For example, in the heading above we wrote “Monday: Outline Your Post With Headings”. If we just wrote “Monday”, skim readers wouldn’t understand what they need to do on that day.
- Professional bloggers rarely use colored headings but some students and teachers like to. If you do choose to use color make sure it’s a dark color that people can read (i.e. avoid yellow/aqua/light green or you’ll leave your readers squinting to make sense of the text).
Example of the structure of Headings
Say you were writing a post about a sports day. Your heading structure could look like this…
H1 (post title): Our Junior Primary School Sports Day
H2: The Sports Day Schedule
H2: Kindergarten Events
H3: Results of the Kindergarten Events
H2: Grade One Events
H3: Results of the Grade One Events
H2: Grade Two Events
H3: Results of the Grade Two Events
H2: Conclusion
Tuesday: Draft Your Post
Today is the day where you’re going to set your timer for 10 minutes and write as much as you can of your post.
Of course, if your typing isn’t overly speedy or you haven’t got your thoughts together, you might need a little more time. However, spending a short block of time on intensive writing can really help you be productive.
Tips for writing your post:
- Just write! Don’t worry about fixing up your spelling or grammar. You can come back to that.
- If you can’t think of the perfect word or phrase to use, just write something and come back to it later.
- You don’t want to do any editing today because giving yourself space to do this with fresh eyes can work wonders!
Wednesday: Add Visuals To Your Post
Remember we mentioned that most readers will just skim your post?
Along with headings, your readers’ eyes will be naturally drawn to images.
Images can help make your blog posts easier to read and understand.
But not all images are created equal.
Firstly, make sure you’re not using copyrighted images:
- Most images you find on a Google or Pinterest search are protected by copyright and cannot be used without permission (even if you attribute them).
- We have a post all about copyright, Creative Commons, and fair use if you’d like to learn more.
- Check out a comparison of sites where you can find images that don’t require attribution.
Also, remember that you can use more than simple pictures:
- You can embed all sorts of media in your blog posts such as comics, quizzes, polls, videos, social media, and more.
- Canva is a fantastic place to make images. You might like to read our guide on using Canva.
- For a quick graph, a handy choice is a free tool call Beam.
- We have a help guide about embedding media if you need more information about this. Alternatively, check out our help guide for adding an image to a blog post.
Now, you could spend a lot longer than 10 minutes on this task. It can be easy to go a little crazy!
Limit yourself to finding one or two great images for your post or making something yourself — e.g. a graph or comparison chart.
Thursday: Edit Your Post
Now the bulk of your post is done, it’s time to come back with fresh eyes to edit.
Tips for editing your post:
- Look at your title. Does it describe your post well? Is it clear? Does it make your visitors want to read your blog post?
- Fix up any spelling or grammar mistakes. Need help with proofreading? Try a free tool like Grammarly. Note: Grammarly is 18+ but users aged between 13-17 can use it with permission.
- Rephrase anything that doesn’t work. If some of your phrases or word choices in your draft weren’t the best, now is the time to fix them up. Use a thesaurus to improve your word choice if necessary. Power Thesaurus is a free crowdsourced online tool.
- Check for readability. Is your post easy to read even if readers are skimming or on a mobile device? Would more paragraph breaks, bullets, or images enhance your post?
- Add and check your links. Including links is an important part of blogging. Your links could either be to other relevant posts on your blog or other websites. Add your links now and ensure those links are working.
- Preview in your browser. Rather than reading through your post in your editor, it can be helpful to press ‘preview’ and look at your post in a new tab. You’ll be able to see what the published post will look like and it might be easier to spot errors.
What else do you need to add to your blog post?
- Add categories and tags. All blog posts need to be in a category and tags can help organize your content. Read more about using categories and tags in this help guide.
- Does your blog post theme have a custom excerpt or a featured image? If so, remember to add this information before you’re done.
- SMO and SEO tips for more advanced bloggers: Remember to fill in the details of your Search Engine Optimization Simple SEO Plugin and Social Media Optimization WP SMO Plugin if you’re using them.
Friday: Publish And Share Your Work!
Yay! You’ve done all the hard work. Now it’s time to publish your post and share it with the world.
Before you do hit publish, it never hurts to preview your blog post and have a final quick read.
When you finally press the publish button, your work is not done. Just because it’s online, doesn’t mean it will be seen.
- Could you share the post on social media?
- Could you comment on another related blog post and leave the URL to your own post in a thoughtful comment?
- Could you email your new post to anyone (especially if you’ve linked to them in your post)?
- Could you pin your post to Pinterest?
5 Ways To Share And Market Your Teacher Blog is a recent post with lots more ideas for what you can do after hitting that publish button.

Summary
We said visuals can enhance your blog posts, right? Here’s a summary of what we discussed. Feel free to share this with fellow bloggers.
Conclusion
Our 5 day plan can be carried out in under one hour a week if you are strict with yourself.
This can be a more productive approach than sitting down in one block of time and trying to get your post started, finished, and published.
Spacing out your post and letting it “marinate” can be an excellent way to ensure your content is top notch!
Finally, remember to figure out what works for you. We’re all different and while it’s interesting to hear about approaches, stay faithful to what you know fits in your schedule and helps you produce the best results.
Further Reading:
Teachers: Finding Time To Blog
12 Tips For Maintaining Momentum With Blogging

hey, just came across this blog page.
I absolutely love the content put up here. It was very helpful and stated clearly.
A must read for people who want to know how to schedule a blog post once a week.
This is a blog that I will definitely reference. I have been wanting to blog for several years now and I finally believe that I have found a place for what I am trying to accomplish. These are awesome instructions.
That’s so great to hear. Good luck and let us know if you need more help to get started with blogging!
This is very similar to how we prepare to write our essays in school. It helps a lot. I’ll try to use that strategy on my next blog!
I’m a student and this will help me a lot
Kathleen,
Thanks for this excellent post. You are always very encouraging!
As you know, I’ve been keen to start blogging for a little while now, and while timing is one of the reasons I’m a bit slow to get started, the other reason is that I worry that there are too many blogs out there and I really don’t have anything new to add! What is your take on that perspective?
Thanks!
Kirsty
Hi Kirsty,
This is a great question and I think it’s something many people ponder. I definitely think there is only one ‘you’ and there is a group of people who would love to hear what you have to say. Your unique voice and experiences will set you apart.
Think about topics that you like following via blogs, social media, podcasts etc. Are you always on the hunt for new people in the fields you’re interested in that you can follow? I know I am!
Also, you might consider if there is a particular ‘niche’ that you can focus on with your blog. I know when I first started blogging, I’d write about anything to do with teaching. That’s fine but I’ve found over time that there are certain niches I tend to write about now — things like digital citizenship, global collaboration, blogging etc. I find that a lot of people who follow my blog are particularly interested in one or more of these areas. The more specific you are, the easier it might be to build a community.
Let’s know if I can help more!
Kathleen
Kathleen, you really know how to help us save time!
Nice ,I am student and I really wanted something like this and I am really sorry to myself that I missed blogging challenge
Hi Bahjat,
The next Student Blogging Challenge will begin in October. While you’re waiting, you’re welcome to work through our Blogging Bootcamp for students that will help you get started with blogging!
It’s free and self-paced. You will find all the steps here https://studentchallenge.edublogs.org/blogging-bootcamp/
Good luck!
Kathleen Morris