Its here! Edublogs has been upgraded to the latest version of WordPress. So lets check out whats under our new Edublogs dashboard and get a quick feel for the main changes!
New Dashboard and Menu Layout
Changes are aimed at making it a cleaner, faster and less cluttered dashboard and you will immediately notice the new light blue, light grey and orange color scheme. If you have several blogs they will be listed across the top and clicking on the name of the blog will take you to the dashboard for that blog.
The main features users interact with (i.e. writing posts and pages, managing posts, managing comments, managing design features and upgrades) are now located on the left side of the screen. While Settings, Plugins and Users, which are used less, are now located on the right hand side. The presentation menu has now been renamed Design i.e. this is where you change your blog theme, widgets or add a custom image header.

Dashboard Widgets
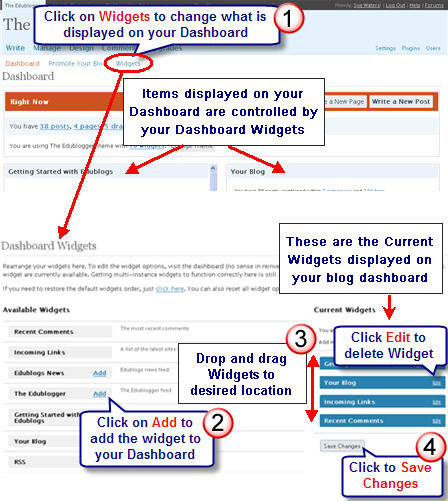
Items displayed on your blog’s dashboard are controlled by widgets which you can customise to your personal preference.
Change dashboard widgets by:
- Clicking on Widgets menu on your dashboard
- In the Available Widget Area click on the Add link on Widget(s) you want to add to your dashboard
- To remove a widget from your Current Widget area click on Edit > Remove.
- Changing order of widgets in your Current Widget area is just a matter of drop and drag the widget’s order up or down
- Click Save Changes
- Click on Dashboard menu and view changes
The main widgets I like displayed on my dashboard are Getting into Edublogs, Your Blog, Incoming Links and Recent Comments.
Write Post/Pages Changes
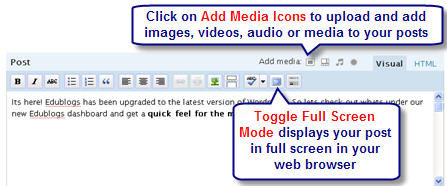
The visual editor has been improved and includes the ability to change to full screen mode when writing a post.
Media is now uploaded to your blog by clicking on the Add media icons at the top of the visual editor. The Add media uses a Flash Uploader — this allows you to upload several items (e.g. photos) at the same time while showing their uploading progress.
NOTE: If your Flash Uploader isn’t working properly try using the Browser uploader instead.

If you are having trouble with the Flash Uploader or getting a white screen when you upload images or media make sure you’ve checked that you are using the latest version of Flash (currently v 9.0.124.0.) Don’t assume that you have this version — go and get the latest Flash player here! (Thanks Trantwoodcrs for reminding me to add this tip)
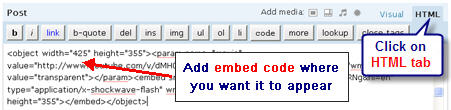
To ‘Embed code’ we pick up around the web (e.g. videos for video sharing websites, Voki and Google Documents) directly into an Edublogs post you now just change to HMTL editor and paste the code where you want it to appear. All you need to do is:
- Write your post
- Grab the embed code for the item you want to embed e.g. a video
- Click on HTML Tab
- Add the embed code where you want it to appear
- Click Publish
No longer appears to be an issue with breaking the embed code. This means once you have added the embed code you can change back to Visual Editor (by clicking on the Visual Tab) and make changes to your post.
Tags and categories fields are now located below your visual editor. The tag editor automatically brings up a selection of the latest tags you’ve added. Learn more about how you use tags and categories by reading this post.
Blog Widgets
The way you add and change the widgets that are displayed on your blog is probably the biggest change. The widgets you currently have in your sidebar are shown on the right side of your screen and it only displays one sidebar (you need to selects the sidebar from a dropdown to view the other sidebar). Each widget is listed in a column on the left, you click the Add link to add it into the sidebar (I demonstrate how to add Widgets to your sidebar at the end of my quick video tour).
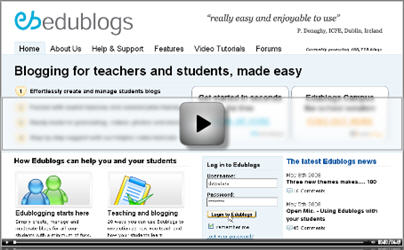
Here’s a quick video tour so you can see the main changes.
Video Tutorials
The Edublogs team has been busy creating video tutorials on how to use the new Edublogs interface — you can check them out on the Edublogs Video Tutorial page. Each of the videos is less than 5 minutes long and between 4-8 MB in size (i.e. suitable for most bandwidth).
FINAL THOUGHTS
I’ve tried to give you are really quick overview of the main changes. Please let me know how you are going and what changes you want to know more about.
Remember the Edublogs team is still squashing a few bugs and adding a few more features over the next few days. If you have any complex questions or issues please post them into the Edublogs forum so the team can provide assistance.
If you are enjoying reading this blog, please consider  Subscribing For Free!
Sue, I’m by no means an experienced blogger here at Edublogs, but I was feeling rather savvy and helped a colleague set up a first ever blog last week – and she’ll be expecting me to be her “guru” for the changes.
Our blog avatars disappeared off the presentation screens of our blogs over the weekend, and I’ve found out how to reinsert that widget – BUT the “time and date” has also reverted, and I can’t for the life of me work out how to restore the time to “+11” for Sydney EST.
I just know she’s going to expect me to know what to do later this week! Help! Please? 😉 Many thanks in advance.
Thanks Sue – very helpful. I may have missed something but I can’t see how I can link to a Word doc or PDF file. I used to just use Upload File but that’s no longer an option. Any advice?
Big help, Sue – you highlighted things I had not yet spotted. Thanks!
Loving it all – and BEST of all…when I upload an audio file I have been wanting up for some time, it is no longer in “chipmunk!”. Previously, there were speed issues that could not be resolved as the file had been sent to me in a format that was apparently incompatible. There must be changes to audio too?
I saved this post for my Sunday morning treat. It is delicious! Thanks, Sue.
What a nice suprise to log on today and find these changes. Very impressed guys… it feels more user-friendly and offers better navigation! thanks.
oh thank u very much sue for that.
P.S i can not whach video to slow of internet.
bye
Thanks everyone for your feedback.
I’ve just amended the post to explain how the Dashboard widgets determine what is displayed in your blog dashboard and how to customise your own dashboard display.
@gminks I assume that you are now able to log into your blog dashboard.
@Blogwalker Good luck Gail with updating the manual – let me know if I can be any assistance.
@Cathy I must be missing it but where is “love the view drafts/view kitchen sink”?
@Marie I believe you have to create an Edublogs account and upload a comment avatar.
@Pina At the top of your Visual Editor (where you write your posts) you will see the words Add Media (on the right hand side). Click on the Add Images Icon then click on link to Browser uploader > Browse image. If you watch my video tutorial it does show how I upload and insert photos to my posts.
Hi Sue
I cant upload any pictures in any of my post’s any more why is that?
Thanks Sue, this was one of the easiest tutorials to follow – great to see how you did it via Jing.
PS how do I upload a picture when I comment?
Hi
With the look in create a new post i can not see how i can upload a picture from my pictures now do you know how?
love the view drafts/view kitchen sink. who thought up that?
Checkout the new Dashboard Widgets guys 🙂
We’ll be putting together new videos and resources too over the coming week.
@MrsMahadevan – Ah, so glad you showed me that tip! I was just assuming that link connected to the commenter’s blog, but now see that the blog URL is right below the link to their comment.
@MrsMahadevan – If you’re logged in to your blog, from the Visit Site view, you’ll see an edit link for each comment. This is a great option for responding directly to a student comment.
I bet you’re looking for an option to edit a post before approving it, right? I don’t think that’s an option (yet).
Panic over, you can edit comments by clicking on the commenter’s name, not as obvious as the old “edit” hyperlink!
How can I edit comments either before or after moderation.?This is essential if I need to edit out pupils’ full names when they shouldn’t have. It is also useful when replying to comments by using italics directly beneath their comment.
I’m in the new dashboard right now, but don’t see “Incoming Links” in the new version. Can I find that option somewhere else? I liked having that quick way to see who was recently linking to my blog.
Gail
Hi Sue and James,
Thanks again for your efforts to provide us with an amazing tool and community.
I’ll start updating my Intro to EB Manual over the weekend and will send you the link as soon I finish.
Gail
Thanks for the changes. They are all great moves and very helpful.
Hi – I can’t log into my admin area.
It’s working well now, even comments are there. Only thing is you have to move your blog avatar across even if it was already on your sidebar.
Great overview Sue, we’re exhausted after an all day upgrade session so this is a massive help 🙂