
In an era of remote teaching and learning due to the global pandemic, teachers and students are relying on video more than ever before.
Video in education can mean a lot of things:
- Teachers finding and sharing videos someone else has made
- Educators create their own videos, often as a screencast or piece to camera
- Teachers hosting video conferences
- Students create their own videos — tutorials, reflections, stop motion, animation or more
Video is an everyday part of most students’ lives and can be a crucial tool in a remote learning curriculum.
But what tools and equipment should you use to create videos, screencasts, or live conferences? Where can you find high-quality videos that others have made? And what’s the best way to share videos you’ve made with others?
This guide will help.
Contents
This post walks you through all aspects of using videos in education.
Click on the links below to navigate this resource.
Note: This post includes honest reviews of a variety of tools. We have no affiliations with any of the brands mentioned in this post.
Creating Videos For Students
When you can’t teach your students face to face, personalized video can be the next best option.
Even during regular school times, many teachers see the advantages of flipping their classrooms. That means students can learn some content outside of class time (often via video, podcasts, or reading). That frees up time on campus for deeper work, discussions, and projects.
So how exactly do you create videos for your students? And should you be pre-recording videos or just running live video conferences?
This is a question we weighed up a little in our guide to teaching online due to school closures. Let’s recap.
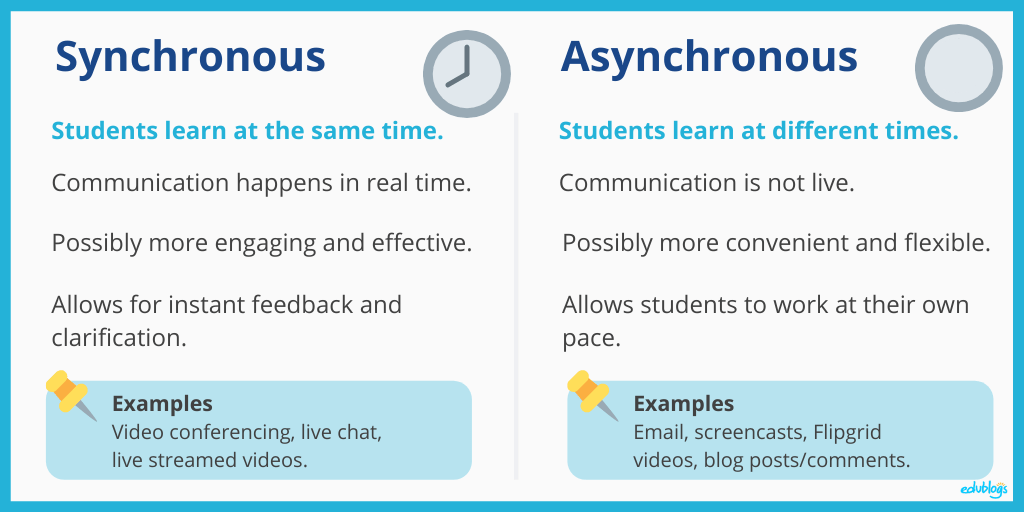
Synchronous or Asynchronous Videos
There are two main options for sharing videos with your learners: synchronous or asynchronous.
Let’s weigh up both options.
Synchronous Videos (Live streaming/Conferences)
This means real-time streaming. It could be a live stream (like on YouTube) or an interactive video conference (like on Zoom).
Pros:
- Some synchronous videos can be recorded so they can be viewed again at a later date. This is useful if students can’t attend the live stream, they have technology issues or need to revise the content.
- Some schools find synchronous videos to be a powerful way to keep the class connected.
- Students can gain feedback, seek clarification, and get answers to their questions quickly.
- Synchronous video conferences can be used in a range of ways: class meetings, office hours (drop in to ask a question), live recess (just for fun), or focussed study groups.
Cons:
- There can be privacy issues if students are shown in synchronous videos and they’re recorded.
- There is also the issue of internet access if students are required to attend regular long live conferences. This can really chew up families’ home internet and can be a major barrier in rural/disadvantaged areas.
- Passively sitting in on lecture-style video conferences can eat into time that could be used on more productive learning and projects.
Asynchronous Videos (Recorded Videos/Screencasts)
This means you record videos that can be viewed (and reviewed) when it suits the student. Your videos could be a simple “piece to camera” or a screencast.
Screencasting is where you narrate a video recording of your computer screen. Sometimes it’s just audio and sometimes you can see your face in the video as well.
Pros:
- For some students, asynchronous learning can be more convenient and allow them to learn at a time and place that works.
- Students can work at their own pace and revise information as needed.
Cons:
- It can be hard for teachers to know whether students watched the videos or were engaging with the work.
- It can be time-consuming to request clarification if some concepts are not fully understood.
You might find it useful to use both synchronous and asynchronous videos at different times.
Here’s a brief summary of what synchronous and asynchronous remote learning looks like:
Now you know more about the options, we’ll take a look at some popular tools for recording both synchronous and asynchronous videos.
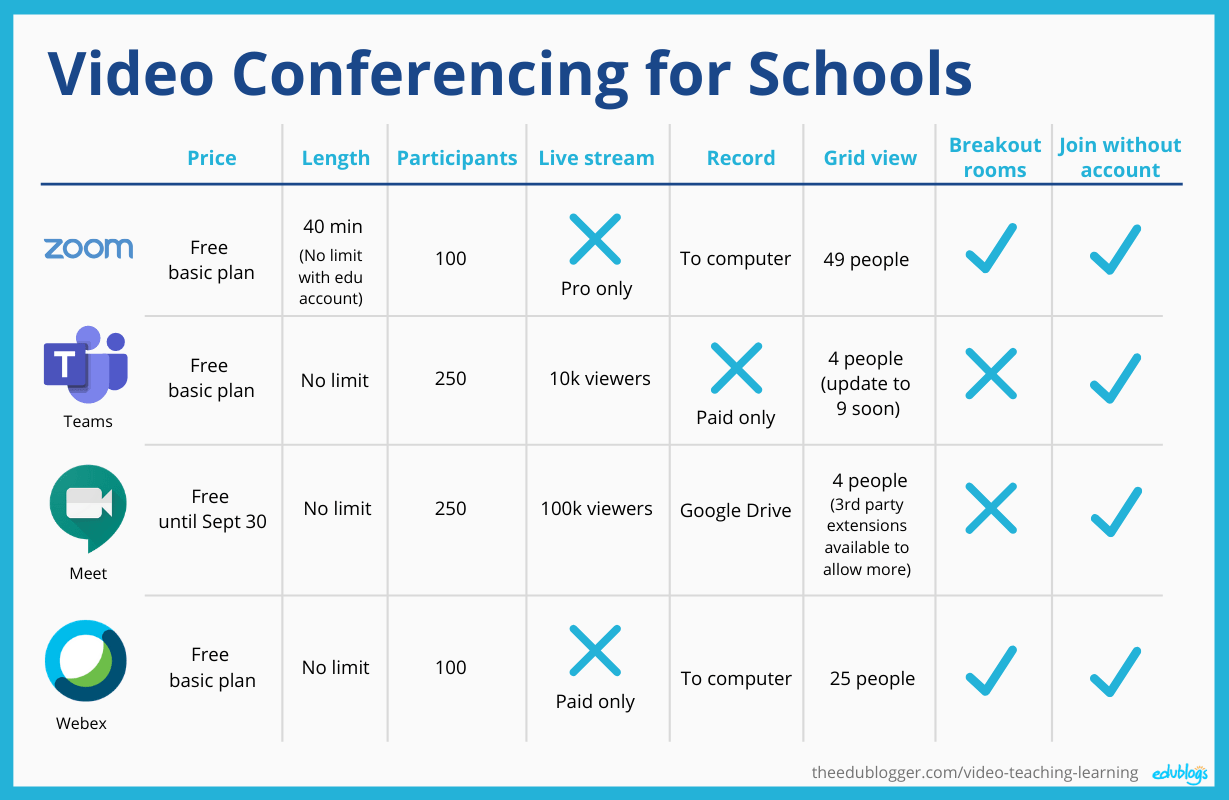
Popular Tools for Synchronous (Live) Video Conferences
There are many tools out there that allow you to connect with students via video. This can really help to unite the class.
Four of the most popular video-conferencing options for teachers and schools include:
- Zoom — Robust software designed exclusively for video conferencing.
- Google Hangouts Meet — The evolved version of classic Hangouts that’s part of G Suite.
- Microsoft Teams– a communication and collaboration platform that is part of Office 365.
- Webex — Cisco tool for video conferencing, online meetings, screen sharing, and webinars.
These tools all allow video conferences with screen-sharing capabilities.
- The teacher can start the conference and share the access link with the students.
- Students can access the conference at the specified time using any device (e.g. laptop or tablet).
- Some people like to use external microphones, headphones, or webcams, however, the camera and microphone attached to your device are probably fine for getting started.
Here is a quick comparison of the free plans for Zoom, Microsoft Teams, Google Hangouts Meet, and Webex Meetings:
Notes on Live Video Tools:
- Safety comes first! Your school or district probably has advice about which video conferencing tool you should use and which settings should be employed. As an example, Zoom has released some best practices in this PDF.
- Zoom, Meet, and Webex temporarily upgraded their free plans for educators but these offers have now ended for Meet and Webex. If your school Zoom account hasn’t already been upgraded, you can apply here to remove the 40-minute time limit.
- Some teachers are also experimenting with live streaming on YouTube. For teenagers, it’s a platform they’re often already familiar with and they can comment in real time.
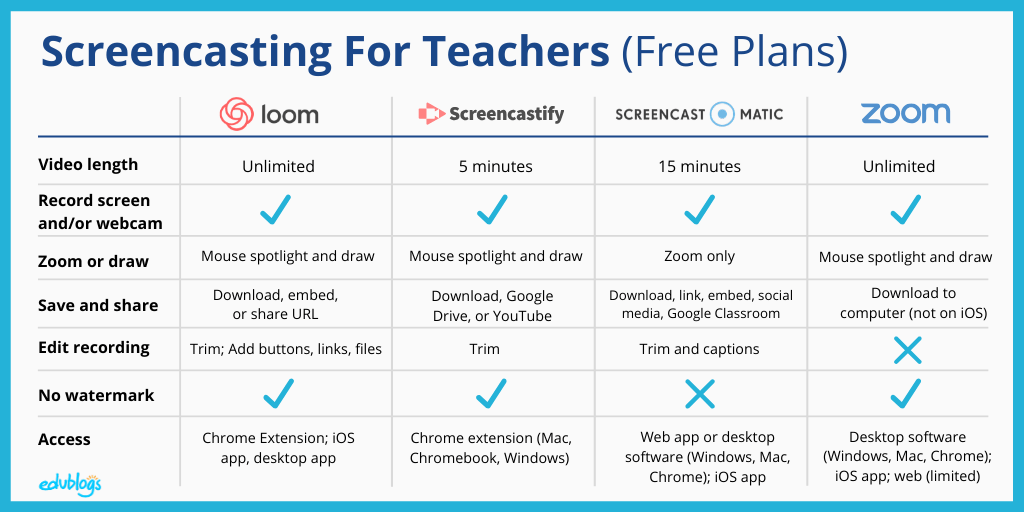
Popular Tools for Recording Screencasts
There are a number of tools available to record screencasts (asynchronous videos). Like many online tools, there are free plans and paid plans.
Let’s compare four of the most popular screencasting tools teachers are using for recording lessons.
This chart compares the features of the free or free education plans (paid plans have more features).
Notes On Screencasting Tools
- I’ve written a blog post specifically about Loom if you want to learn more. There are no age restrictions so students can use Loom if you want them to make screencasts. The pro Education version is free to teachers and students forever.
- You’ll remember that Zoom is a popular tool for video conferencing. The 40 minute time limit on free accounts has been temporarily removed for educators. To record a screencast using Zoom, you start a meeting with yourself as the only participant and record the conference. You can’t record if you’re using the Zoom iOS app.
Free Online Tools For Making Educational Videos
Making your own videos is easier than ever! Apart from the screencasting tools mentioned above, there are online video creation tools that are:
- free/paid
- simple/complex
- for editing/creating
- for all ages/restricted to over 13 or 18
Here are six free options for creating different sorts of videos using online tools. Feel free to share your own ideas too!
Lumen5
Lumen5 is a free drag-and-drop video creator. You can turn images, short clips, GIFs, and music into engaging and educational videos.
It can even “automagically” make your blog post into a video (for best results you’ll need to edit it slightly).
Here’s a one-minute explanation:
Lumen5 contains a library of Creative Commons Zero images and music so you don’t need to search for content either (although you can use your own pictures and video).
The free plan is becoming increasingly restrictive. As of November 2020, it allows you to make 3 videos a month with the Lumen5 watermark.
The only downside (apart from it being a 13+ tool) is you can’t embed your video directly onto your blog. So you have to put it on social media or YouTube first and then get the embed code from there. Or you could download the video and upload it directly into your post/page if it’s a small file.
Animation (PowToon or Biteable)
There are a number of ways you can create simple animations online. Two free tools you might be interested in exploring or using with your students include PowToon and Biteable.
Both of these tools have free plans and can be used by students under 13, however, they do require students to sign up via email.
Powtoon’s free plan allows you to make 3-minute videos with the Powtoon branding visible. Biteable’s free plan allows you to create as many videos as you like (with a watermark) and share 10 of them.
One benefit of PowToon over Biteable is that you can download your finished product as a PowerPoint or PDF file. You can only download your Biteable creation with a paid plan; you have to share your Biteable video by embedding it or sharing a link with the free plan.
You can embed both PowToon and Biteable videos into your blog posts or pages.
PowToon
PowToon is a quick video that gives you a glimpse of the drop and drag editor.
Biteable
Here’s a quick video tutorial that shows you how to use Biteable from Kyle Niemis.
EdPuzzle
EdPuzzle is a popular tool to turn any educational video into a lesson. The videos can come from YouTube, National Geographic, Khan Academy, or other sources, including your own videos.
EdPuzzle’s tools allow you to check if students are watching your videos and understanding the content through inbuilt questions and narrations.
EdPuzzle has free plans where you can store 20 videos.
This one minute video explains what EdPuzzle is all about.
You can embed EdPuzzles into your blog. These instructions show how to find the embed code.
Animoto
Animoto allows you to create videos from photos, video clips, and music either on the web or on an app on your mobile device.
It’s an intuitive tool that allows you to create a professional-looking video in minutes.
Educators can sign up for a free account which allows you to create student accounts as well.
Animoto has been around since the early days of “Web 2.0” and continues to improve.
You can embed Animoto videos on your blog. This help guide shows you where to find the embed code.
Here’s an example template for a vocabulary lesson.
Flipgrid
Flipgrid is a video discussion platform from Microsoft. It’s 100% free (even pre-pandemic).
Using Flipgrid, you add topics to a grid. A topic can include text, links, videos, images, or more. Students respond to your topics with their own videos — you can set the video maximum video length from 15 seconds up to 10 minutes. Students can record themselves or their screens.
Flipgrid allows you to facilitate engaging asynchronous video discussions. You can include your whole class in the grid and even families and students from other schools.
This Getting Started video for educators explains how to get going with Flipgrid.
You can embed Flipgrid videos on your blog (or LMS). This will allow students to watch and/or record videos without having to leave your class blog. Here are the instructions to find the embed code.
Video Creation Techniques
Online tools are great but you can make videos in the traditional way too, as can your students. You don’t need any fancy equipment either — a phone, tablet, or webcam can work just fine!
Let’s go through three popular techniques for creating videos:
- Piece to camera
- Teach in front of a whiteboard
- Green screen videos
Piece To Camera
I know, I know… who likes getting in front of a camera? Most teachers would avoid it at all costs! But it is really a great way to connect with students and families.
There are lots of reasons you could create a piece to camera:
- Welcoming students and families at the start of the school week if you’re learning remotely, or at the start of the school year during normal times.
- Thanking your class and families at the end of the school week/year/term and reflecting on what went well.
- Explaining learning tasks or giving feedback.
You might encourage students to create these sorts of videos too. As always, check your school guidelines if student videos are going to be shared digitally.
Here is an example Linda Yollis made to welcome her new students to the classroom last year. She cleverly used a “B roll” to show some footage while talking but you can keep it simple.
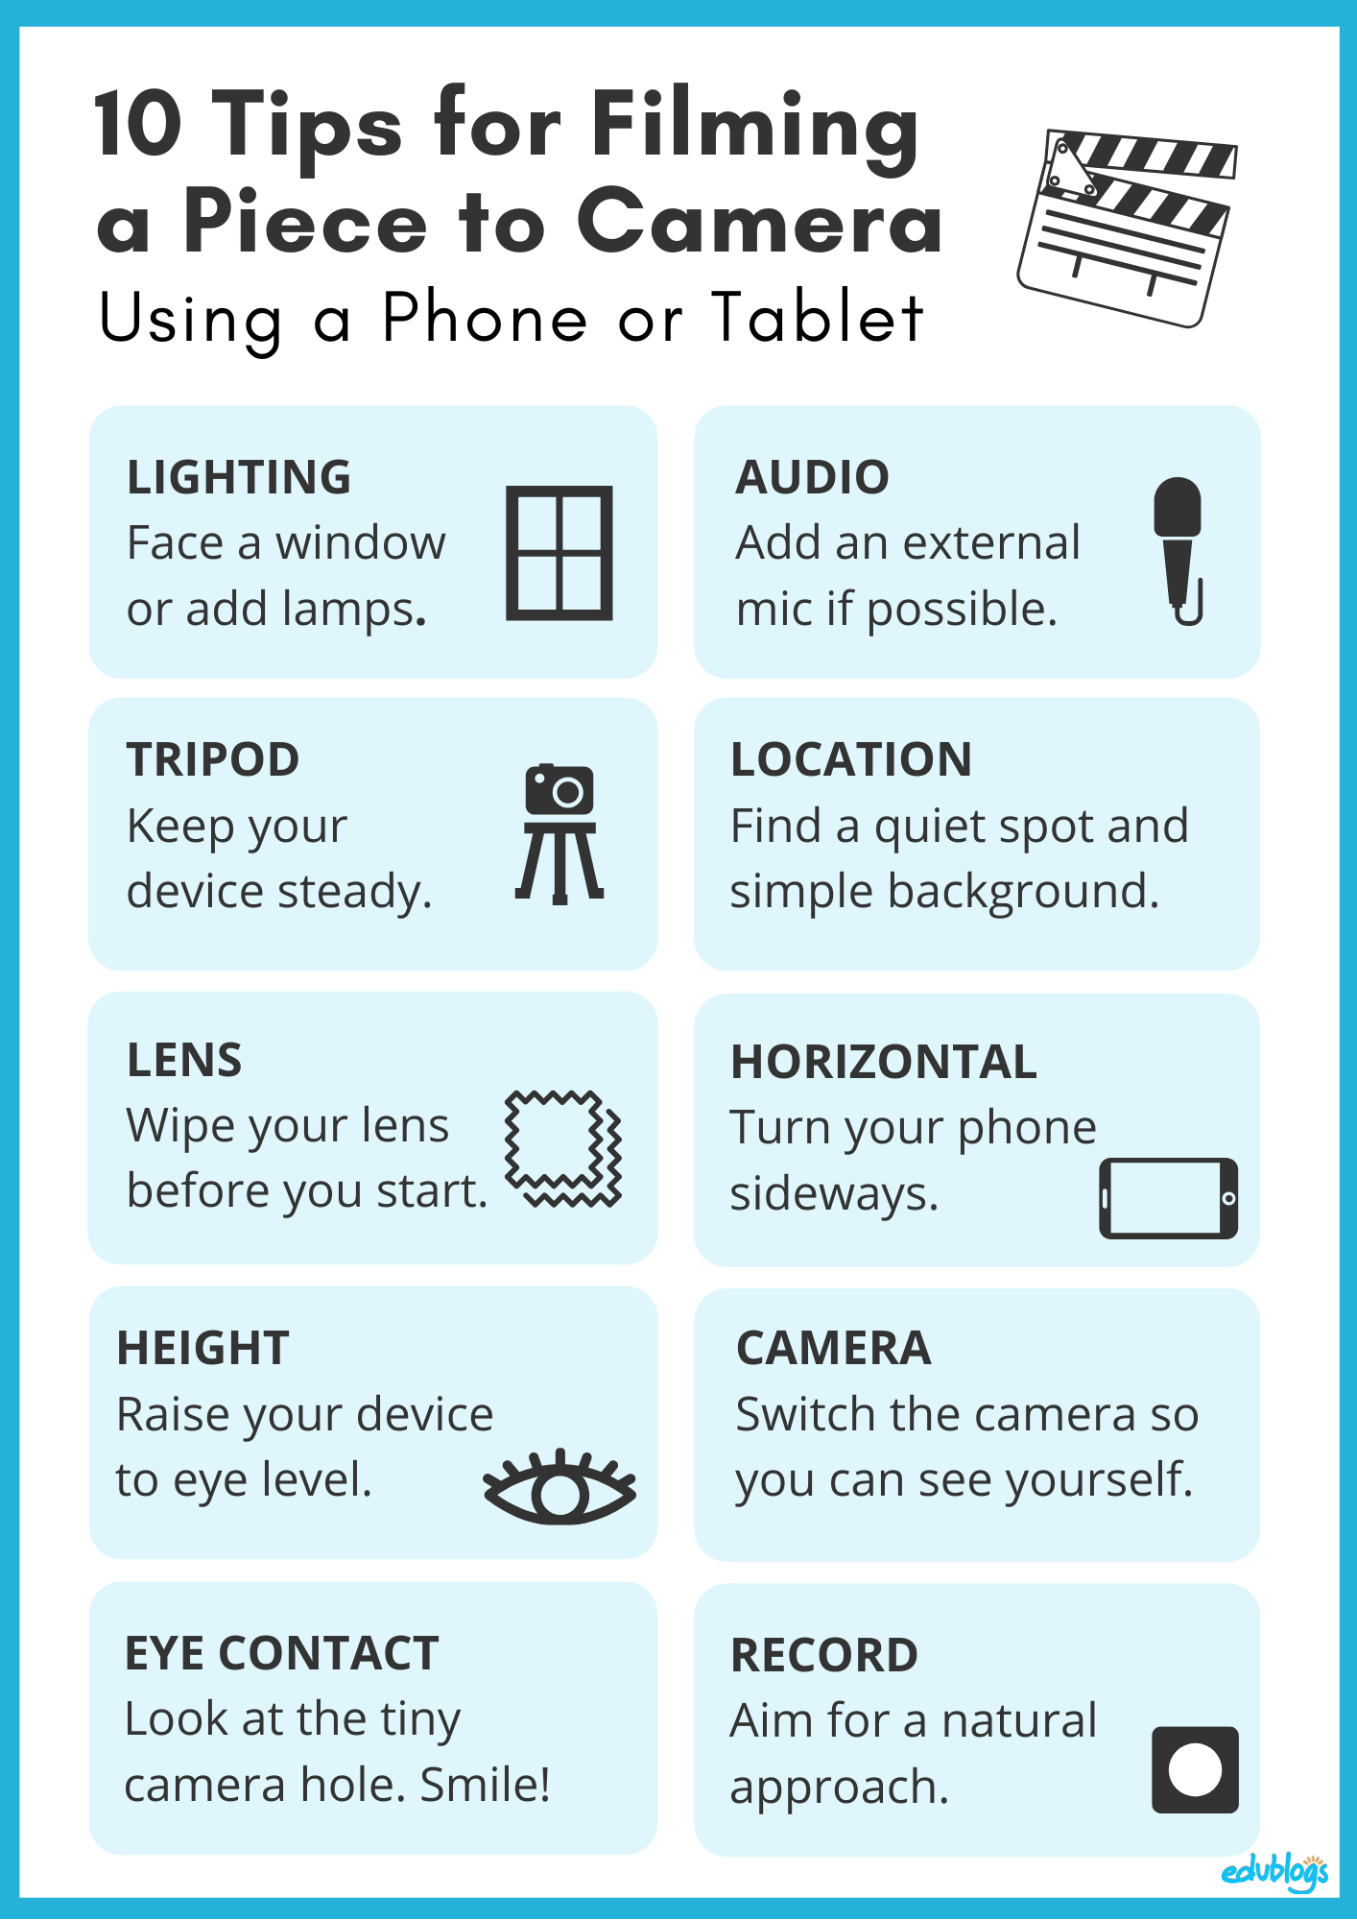
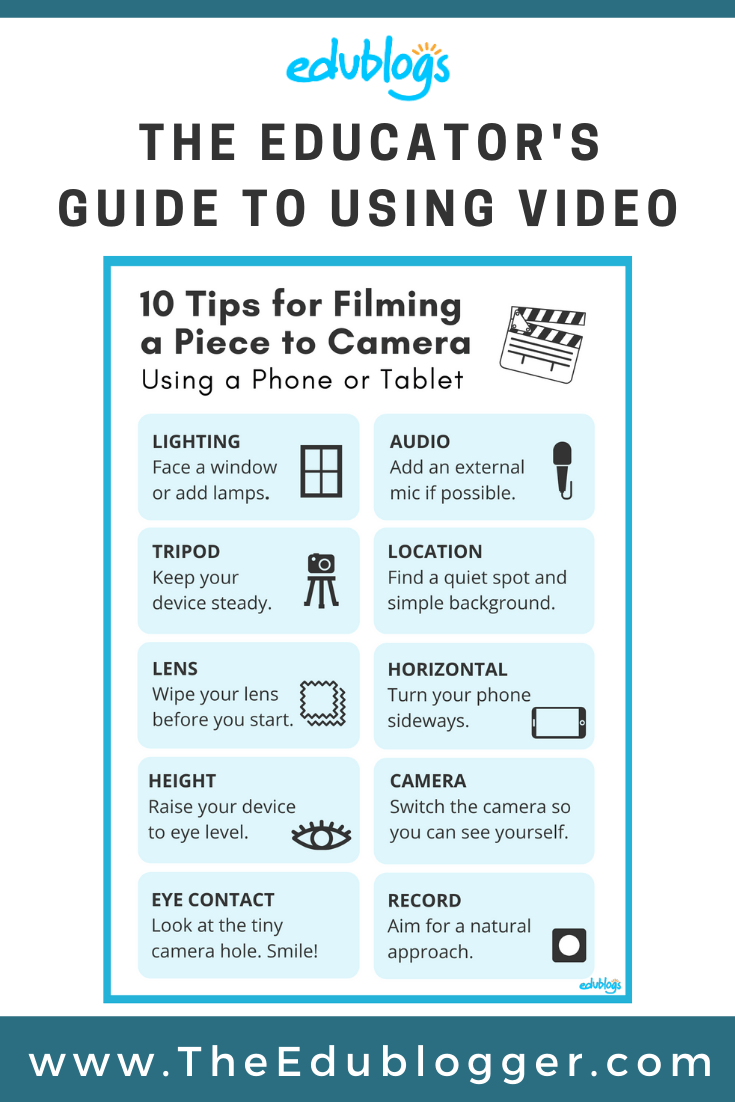
10 Tips For Filming A Piece To Camera
Filming a piece to the camera on your phone or tablet? While it doesn’t have to be perfect, there are a few easy things you can do to enhance the quality of your video.
- Lighting: This is really important! Sit near a window if you can or add lamps. Aim for even natural light. Don’t have a window or other light source behind you? Walk around your house with your device while looking at your screen to find the best lighting.
- Audio: Your mobile device will record video just fine (in good lighting) but the audio quality won’t be great. Add an external microphone if possible. Personally, I use the Boya Lavalier lapel microphone. It’s under $30 and works great (no affiliations here!). If you use an iPhone/iPad, you’ll need the headphone jack adapter to plug in your mic.
- Tripod: If you’re using a phone, it needs to be steady. Many discount stores now sell basic phone tripods (for example, I got this $8 one from Kmart Australia). You can elevate these on furniture or books as needed.
- Location: Keep your background simple but it doesn’t have to be totally bare. Remember, if you’re using a phone, the background won’t blur like it does with a professional camera — just be aware if you have personal belongings in the shot. Aim to film in a quiet location.
- Clean your lens: Especially if you’re filming on your phone, wipe that dirty lens before you start. It’s a simple tip that’s often overlooked (you should also do that before you take photos).
- Horizontal: If you’re using a phone, turn it on its side. That way, it will fill the whole frame when people are watching the video on their computer/device/tv. If you want to know more about why your video should be horizontal, you might enjoy this funny video.
- Raise your device: You want your device to be around eye level. If it’s too high or low, your face proportions won’t look right. You might need to prop up your device on books.
- Front facing camera: If you’re alone, switch the camera so you can see where you are in the frame (consider positioning yourself slightly off center in the frame). If you have someone else to film you, the quality will be better filming the regular way.
- Look at the lens: Find the tiny hole and try to make eye contact with it. You don’t have to stare at it. You can look away occasionally but don’t look at yourself on screen if you’re using the front-facing camera. Smile!
- Record: Whether or not you want to actually script what you want to say is up to you. A more natural approach may be to create a few notes or an outline, rather than scripting or reading. Pace yourself and enjoy!
Remember, your video doesn’t have to be long. A short video is often a good video!
📌 Want to share these tips with colleagues or students? Download the PDF.
Teach In Front Of A Whiteboard
One of the simplest ways to create a video is to do what you know best — film yourself teaching.
Eddie Woo is a Sydney maths teacher who has been filming himself teaching maths for years. He has a huge following not just from his own students but from students across the world.
Eddie has a YouTube channel and houses his videos on his blog too.
Here is an example…
These sorts of teaching videos come into their own during periods of remote learning but are useful at any time of the year.
Another teacher who is producing maths videos is Joel Speranza.
Joel is publishing his videos to YouTube and housing them on his website.
What is different about Joel’s videos, is he is using a variety of techniques, including a homemade “Lightboard”.
This short video demonstrates Joel’s video techniques.
Of course, students can “be the teacher” too and record tutorials for other students.
Green Screen Videos
You’ve probably heard of green-screen videos? This is where you replace the real background of a video with a digital background. To do this, you need to film against a green screen. This could be either a screen bought specifically for video creation or something more ad-hoc — a piece of green cloth, green paper, a green shower curtain, or a wall painted green.
A green screen can even be a shirt!
Love experimenting with the green screen app by @doinks and thinking of different ways of using it in #physed…will be showcasing this tomorrow with my Ss #physed #pegeeks #pechat #ukpechat pic.twitter.com/6Zfovmb8JP
— Adam Llevo (@MrAdamPE) October 4, 2018
Here’s an example of a remote learning video that uses a green screen video from a kindergarten teacher from Texas.
I may have a slight addiction to @DoInkTweets and @PicPlayPost!😊🤗🤩 #eLearning #ObsessedWithGreenScreens pic.twitter.com/3pQ1tpV4VS
— Rachel Doran (@rachel_doran_) April 15, 2020
Want to learn more about green screens?
- Green Screen by DoInk is a popular app you can use on an iPhone or iPad.
- Tony Vincent has compiled some different green screen setups.
- LitFilmFest has shared 7 tips for using a green screen in the classroom.
- Green Screens projects can be “mini” sized too as explained by Anita Goodwin.
Video Editing Software And Apps
Most people know how to record a video. It can be as simple as opening the camera function on your phone and hitting the record.
But then what do you do with your raw video?
It’s not always essential, but you’ll generally want to do some basic editing. This can include things like:
- Adding text titles or captions
- Adding music
- Chopping out certain parts of the video
- Mixing together video and images
Let’s go through some options for editing videos on the cloud, on a computer, or on a mobile device.
Editing Software (Computer)
WeVideo (Cloud editing software)
WeVideo is a cloud-based video editing tool that allows students and teachers to get creative.
Educators can make videos for their classes, while students could have fun responding to some of their learning tasks as a video. They can also collaborate with peers on projects.
WeVideo also recently introduced screencasting.
While WeVideo For Schools was free for schools affected by COVID-19 in early/mid 2020, this offer has now expired. Therefore the main barrier to using WeVideo is cost. There is a free WeVideo plan but you can only create 5 minutes of footage per month, it includes WeVideo branding, and most features are missing. You can read more about WeVideo pricing here.
If you use a Mac computer, the go-to program is generally iMovie. You can also use the iMovie app on your iPhone or iPad if you have one.
iMovie is a free and robust tool that allows you to create anything from a short video clip to a full-length movie. There’s only a small learning curve involved in getting the hang of iMovie, and it comes with templates for layout and music.
If you have a recommendation for a free Windows editing software, please let us know in the comment section below. Windows Movie Maker used to be a popular choice for simple editing but it has been discontinued now.
Editing Apps (Phones/Tablets)
There are a lot of video editing apps out there. They’re not all created equal and most have “in-app purchases”.
For quick video editing on my phone, I love a free app from GoPro called Quik and another one called Splice. They don’t have in-app purchases.
- Quik puts everything together for you with music, transitions, and other cool effects.
- Splice is handy if you want to make more manual edits and don’t necessarily want too many effects.
Let us know your choice of video editor in a comment.
How To Share Your Videos With Others
Videos can be quick and easy to make but sharing them can be more difficult due to large file sizes.
You’ve probably already figured out that most video files are too big to email.
So what do you do if you need to share a video with students, teachers, or families?
Firstly, consider whether the videos you’re making are too long. Educational videos should be as long as they need to be in order to meet the learning objective but no longer. Studies show that after 6 minutes, engagement drops off.
If you’re an educator asking your students to create videos for assignments, you might want to be specific about length so you don’t run into problems receiving and viewing their work.
When it comes to sharing your videos, there are a few options:
- Add your video to an online hosting site (e.g. YouTube, Vimeo, TeacherTube)
- Add your video to Google Drive
- Upload to another Cloud service like DropBox or OneDrive
- Add your video to social media (many services have limits on video length e.g. Instagram 60 seconds, Twitter 2 minutes 20 seconds, LinkedIn 10 minutes, Facebook 120 minutes)
Once you’ve uploaded to one of these services, you can embed the video on your blog, website, or LMS, or share a link. Many videos are too large to upload directly to your blog or site. If you’re embedding a video, you can use the instructions we covered earlier in the post.
If you’re uploading your educational videos to a platform like YouTube or social media, check your school/district guidelines for advice and choose your privacy settings carefully.
💡 If your students are making videos and have a Google account, there is an option for students to upload their video file in a Google Form. You can find out more about that here.
Back to top
Using Videos That Others Have Made
We’re fortunate to live in a time when there is a massive library of video content available to us.
The problem is, that it’s often a case of searching for a needle in a haystack to find the right video. Because it’s so easy to make videos, there is a lot of low-quality or inappropriate content out there.
Choosing Videos For Your Students
When considering sharing a video with students, you need to ask yourself:
- Is the video age-appropriate?
- Is the video accurate? Remember, you can’t believe everything you see online.
- Does it meet the learning needs of your students?
- Is it designed to educate about a topic or is there another purpose? (e.g. to entertain or to teach English)
- Is the video made by an educator or someone with appropriate credentials?
- Is the video the right length for your students? i.e. just long enough to cover all the content but not so long that students will tune out.
👉🏽 Remember: Watch the whole video before sharing it with students. It’s tempting to just watch a short snippet but it’s best to screen the whole thing. Of course, if you work with a team of educators, you could share this responsibility.
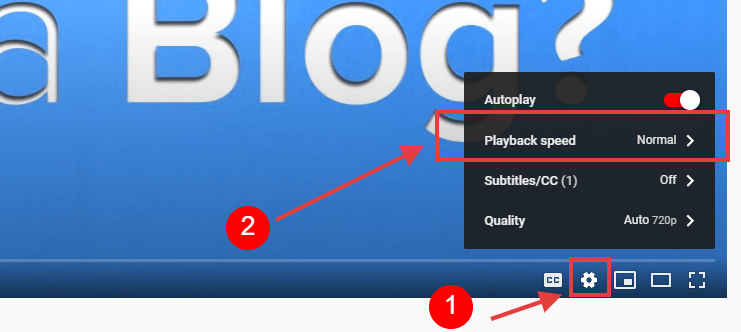
👉🏽 Tip: Increasing the playback speed a little may help if you need to get through reviewing a YouTube video in a shorter amount of time! Click on the gear icon and then “Playback Speed”. You can then increase the speed to 1.25 or 1.5, for example.
Free Online Video Libraries
So where can you start looking for video content that will meet the needs of your students?
YouTube is the obvious choice but there are some issues to think about with YouTube, and more importantly, there are other useful video libraries:
- TED-ed (free videos and lessons)
- BrainPOP and BrainPOP Junior (teachers and families can request free access due to school closures)
- CommonCraft (classic explanation videos mainly about tech and society with lots of free options)
- GoNoodle (engaging movement and mindfulness-based videos for students. Great for brain breaks)
- Storyline Online (actors reading storybooks)
There are also sites that curate and organize useful educational videos from a variety of websites. One example is WhatKnowLearn which brings together 50,000 videos that are screened and categorized by educators.
Many Australian teachers are enjoying ClickView and ABC Education. Some American teachers have recommended PBS LearningMedia and PBS Kids. Perhaps there are local video libraries in your area too?
Some teachers have also pointed out they like using the short videos shared on Instagram. For example, to introduce students to authors or share art or coding skills. While there may be a plethora of options, Instagram would obviously need to be screened carefully.
Do you have a favorite site to find educational videos? Let us know in a comment.
How to Embed A Video On Your Blog
Many teachers and students like to embed videos they find online on their own blogs. That means you can play it within the post without having to open new tabs or leave the blog.
If you use a learning management system, you should be able to embed videos too.
Let’s take a look at how to embed a video in a blog that’s hosted by Edublogs/CampusPress/WordPress.
An embedded video looks like this.
👉🏽 Tip: When embedding a video, it’s a good idea to also put a link to the video near the embed, like this:
Check out the video, What Is A Blog?
Educators or students might embed videos from sites like:
Methods For Embedding Videos
Videos from video-sharing websites can be embedded into posts or pages by using:
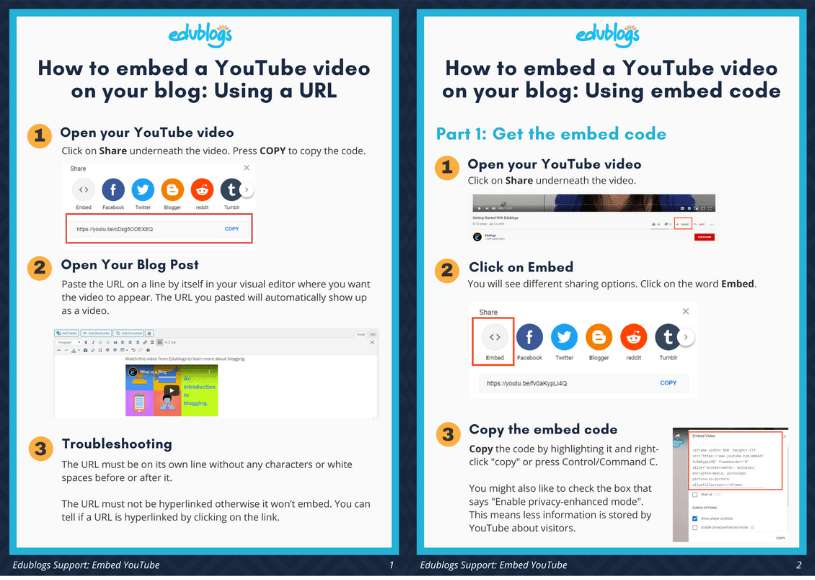
- The video URL: Paste the URL on a line by itself in your post/page editor where you want the video to appear. This method only works with certain services, like YouTube.
- The embed code: Find the embed code on the site you’re using (e.g. YouTube) and copy it. Then in your post put your cursor where you want the video. Click on Add Media and then Insert Embed Code. Paste the code and press Insert into the post. Note: embedding isn’t available on free blogs to prevent misuse from spammers.
You can find the full instructions on how to embed videos in this Help Guide or check out the PDF below for detailed instructions for YouTube.
Copyright And Videos
You may be wondering about copyright because we know we can’t just take an image from another site and use it on our blog. So can you embed a video from YouTube (or similar sites) on your blog?
In short, yes.
If a video creator leaves the embed functionality enabled on YouTube or a similar site, that means they agree for it to be shared.
That being said, you can’t necessarily download or make changes to the video (for example, cutting it up, remixing, adding audio, and so on.). So steer clear of that!
YouTube And Safety Concerns
Access to sites like YouTube is a contentious topic in schools. Feel free to leave a comment if you have any experiences with that issue.
The YouTube Terms of Service are very clear in that YouTube should not be used by children under 13 – even with parental permission.

In some countries, this age can be even older, and you should check youtube.com/t/terms for the latest and the requirements where you live.
The biggest concern involves the ads that will play before most YouTube videos, as the ad that shows with a teacher previews a video may not be the ad that shows when a student goes to watch it.
Another concern is the comments that may be shown below a YouTube video.
If you still choose to use YouTube, here are a few tips we recommend to minimize potential problems:
- Set up a class or teacher account if you plan to upload videos or create playlists. This helps separate your work videos from your personal videos. The University of Massachusetts has a guide to creating YouTube playlists which you can access here.
- Look for videos that have comments disabled.
- Embed the video in your blog or LMS when possible which will usually have fewer ads and distractions.
An alternative to embedding videos, especially for younger students, is to give a “safe” link such as the ones described below.
Use Safe.link
If you really have to link to a YouTube video, then video.link may help.
You simply visit the video.link website, paste in your YouTube link, and generate a new ‘safe link’ that you share with your students.
One of the main benefits is no registration is required. The ‘safe link’ will do its best to block any ads and not show any comments.
In this video, Richard Byrne from Free Tech for Teachers explains how to use four distraction-free YouTube sites — SafeShare.tv, Quietube, Watchkin, and Google Slides.
Conclusion
In this post, you learned:
- Pros and cons of synchronous and asynchronous videos
- Popular tools for live video conferences and screencasts
- Free online tools for making educational videos
- How to film a piece to camera and other educational video techniques
- Popular tools for editing videos
- How to share videos you’ve made with others
- How to find and use videos that others have made
- How to embed videos on your blog
- Copyright and safety concerns when using videos from sites like YouTube
We’ve covered a lot and hopefully, we’ve inspired you to have a go at using some of the tools or techniques mentioned in the post. If you do, we’d love to see what you create or hear about it in a comment!
Scroll down to find the comment box.
We’d also love to hear your own suggestions for finding or creating videos.
Lights, camera, action … and over to you!
About Us
At CampusPress, we’re experts in bringing innovative web solutions to schools, school districts, colleges, and universities through WordPress and our wide range of out-of-the-box and custom plugins and products.
In fact, our services in accessibility, security, hosting, and support, along with an extensive suite of other tools, power millions of education websites, blog networks, and portfolios. Learn more about our school website services or request info today!
I think sharing videos is a good tool to use so we can learn how to do things that are useful to us.