When you upload an image you are given three versions that you can insert into the post:
- Thumbnail (150 x 150 pixels)
- Medium (300 x 300 pixels)
- Full Size
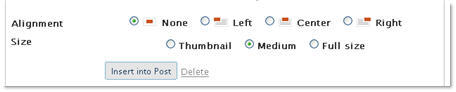
If you are like me and prefer specific sizes of images in blog posts you are able to change the size of thumbnail and medium sized images under Settings > Miscellaneous.

What you mightn’t have realized is that when you insert an image into a post using the “full size” option, the image is automatically resized to a maximum width of 500 pixels. This has been done to prevent the problem of wide images in blog posts caused when people post photos straight from digital cameras.
It is important to realize how wide an image can be depends on your blog theme. Some themes 500 pixels is too wide and the image will flow into your sidebar area. While other themes can cope with images wider than 500.
Maximum image width for the following themes are:
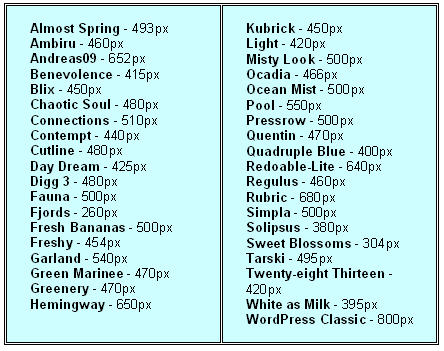
 You also need to remember that image size in posts isn’t affected when you change blog themes so the image width you used on your old theme may be too large for your new theme e.g. go from Cutline (480 px) to Quadruple Blue (400 px).
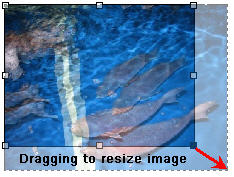
You can increase the width of an image by clicking and dragging the image to the required size. DON’T insert a “medium size” image and drag to the larger size because this affects the quality of the image.
Compare the quality of this “Medium Sized” image dragged to 500 pixels wide:

With this “Full Size” image:
FINAL THOUGHTS
While the “full size” option does automatically resized to a maximum width of 500 pixels its not a good idea to upload images directly from your digital camera to your blog posts. Resizing before uploading is the better option which I will cover in my next post.
If you currently resize images please tell us about what tool(s) you use and why? And any links or information that would help others understand about resizing and image quality.
If you are enjoying reading this blog, please consider Subscribing For Free!
very helpful article… thanks… 🙂
@Marie Glad you find the post helpful. Have to admit I mainly use Picture manager to resize my photos — it’s just what I’m used to.
Sue, excellent and timely post for me! The easiest tool I have found is Microsoft’s Picture Manager . From the menu, click on picture > compress pictures, on the RHS > click on the button ‘compress for web pages’. Simple. With other programs like Paint.net I was never sure how much to resize the image …
Thanks, thanks, thanks dear Sue! I finally found an answer to my problem! It was not a big deal, but I always wondered why it was only me who could not put pictures in the center!
My student did that, but I could not!
I will try choosing 5 to horizontal and vertical space field!
As for adding few blank lines after the picture, I tried that but it did not work! Once I click save and publish, words go up next to the pictures!
Thanks for the tips! 🙂
@Manal At the moment the blog theme you use tends to influence which side your image prefers to be displayed and you won’t be able to get images to center. For my blog theme I need to align to the right. To prevent the text from coming up too close to the image what I do is insert the image then click on the image and then click on Edit/Insert Image button and add the number 5 to the vertical and horizontal space field.
Your blog template can handle images large than the max. 500 pixels wide and it is okay to expand the image provided you use an image that is already wide and insert the full size into the post. If the original image you upload is already really small e.g. 200 pixels and you expand to more than 500 pixels it will become blurred. Your current blog theme can handle images 670 pixels wide but you do need to remember that if you change to another theme that others won’t. Does adding a few blank lines after adding a photo help issue of the wide images and text wrapping?
O.k, that’s wonderful. I always enlarge images, not knowing the effect it has on the quality!
However, I’m having real trouble with the images placement! My images always go to the side even if I put them in the center. Once I click save or publish, the image or photo goes to the side with my writing beside them.
That is why I had to enlarge images!!! If I insist on having my images in the centre, I make the image as large as possible so it fills the whole place and there is way of it going to the side!!
You can have a look at my blog: becauseitmatters.edublogs.org
look at the post” Do not be stingy” where I have enlarged two pictures, one at the beginning of the post and one at the end!
All picture in my other posts go to the site! What can I do??
@Mike I also have Photoshop however mainly use it when I want to be very creative with images. I agree always better to resize the original.
@Clix I mostly use Picture Manager to resize images — its more a case of what I’m used to using.
@Ken For some reasons the links you have inserted aren’t working. Can I get you to email them to me and I will add them for you? I can use Photoshop but wish I was better at using it.
@Markoroom12 But tricky for you as You are using Mandigo which supports images wider than 500 but if you change templates then you will have issues with image width. Definitely make sure you resize the original rather than stretch a smaller image to a larger size.
Hello Sue!
I’ve allways woundered why my pictures have gone all funny when I try to streach them to 400 or 500 pixels. Thank, this post has helped me alot! I use to use Microsoft Paint to crop and re-size my pictures. You can have a look at my edublog at:
http://markoroom12.edublogs.org
Thanks
Marko
Kia ora Sue!
Thanks for this post! Images are always nice-to-haves and your earlier tips on copyright have also been to the point.
I always have an open mind when it comes to illustrations for any purpose. I loved the cartoons that Kevin brought to us with the cartoon technology. Recently I’ve been using a few different ideas for images most of which I’ve created for myself, some with the expert artistic help of my daughter Hannah.
I’ve pottered around with Graffiti in Facebook. It can produce some vibrant colours that I can capture simply by a screendump. When I crop and resize the images I use Adobe Photoshop. This also permits all sorts of other adjustments to be made on colour, brightness, contrast and a host of other parameters such as in the picture of frusty me and the addition of notes and captions.
Ka kite
Depends what computer I’m on. When we’re working on the yearbook, we use Photoshop or The Gimp. But if all I need to do is resize, sometimes I’ll just open Paint.
I’m lucky enough to have a copy of photoshop which makes life very easy. But you could use paint.net which is free.
Other programs like Adobe Photoshop Elements or another free one The Gimp will also do the job.
A slight digression there are two types of 2D graphics. Vector and Bitmap.
Vector images are created mathematically from points, lines, curves and shapes. They can be resized with no loss of definition.
A Bitmap is created from pixels (little squares) of colour.
Photographs from digital cameras are bitmap images saved in jpeg format.
If you resize a bitmap just by dragging outwards you enlarge the individual pixels and lose clarity and definition. Better to resize your original to the new dimensions.