I’m frequently asked how to add images to blog sidebars — so I thought it would help to share my quick and easy cheats method.
So what do you need to know to do this?
To start with you need to understand that you need to:
- Write HTML code which links to the location of your image
- Add your HTML code to a text widget in your sidebar
Now that I’ve said blah blah HTML code twice…you’re probably thinking that I’ve made it too hard already.
It’s not but I first need to explain what is HTML code and then show you it’s really easy when you know my trick 😎
What is HTML?
HTML is short for “Hyper Text Markup Language” which is a language used to tell a browser how to organise the layout of a web page it has downloaded from the Internet. It influences if text is bold, italics, a heading, bullet points.
When you write a post or page inside your blog dashboard you don’t worry about how to write HTML because the Visual Editor does it for you. If you click on the HTML tab it shows the HTML code in your text.
Here’s the Trick!
As I said you need to use HTML but that doesn’t mean you can’t cheat with writing the HTML code.
Instead use your Visual Editor to do the work for you!
Cheating is as simple as:
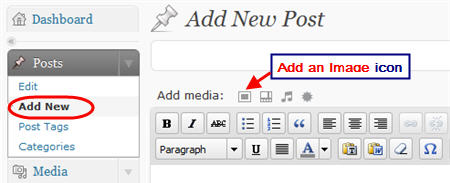
1. Open up a draft post in your blog dashboard
2. Click on Add an Image to upload your image to the post
- Ideally resize your image before uploading to 170 pixels wide because this generally the best width for most blog sidebars
3. Insert the title for your image (this displays when a reader hovers their mouse over the image)
4. Change the link URL — if you want to link your image to a website
- In this example, I’ve change the link so it goes to http://larryferlazzo.edublogs.org/2010/01/30/excerpt-from-my-upcoming-book-on-teaching-english-language-learners/ instead of the image URL
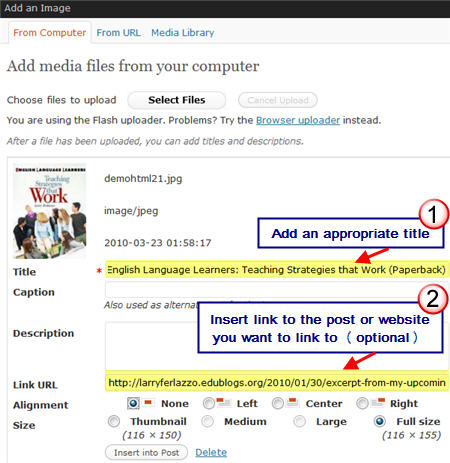
5. Click on Insert into Post
6. If you want to add any text below your image — just write it!
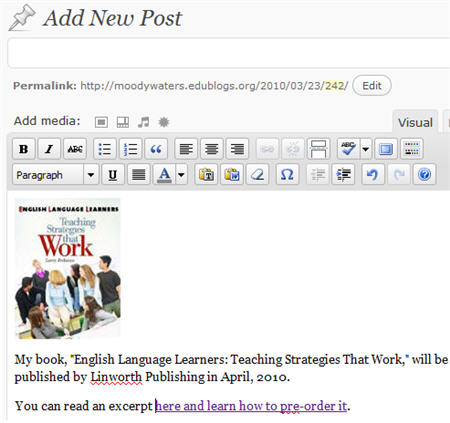
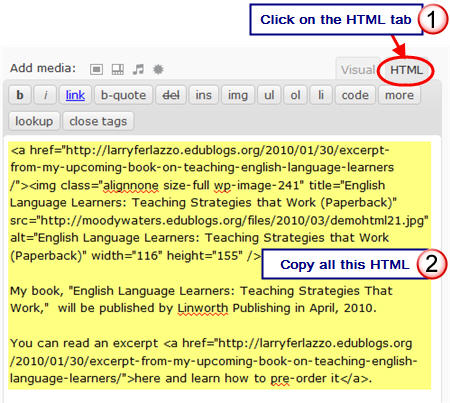
7. Now click on the HTML tab and copy all the HTML code.
8. Go to Appearance > Widgets in your blog dashboard
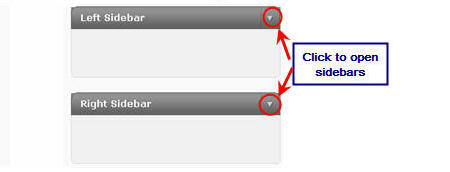
9. Click on the desired Sidebar to expand (so you can add the widgets)
Please note: In new blogs sidebars in your dashboard are empty and adding widgets automatically removes the default Edublogs widgets
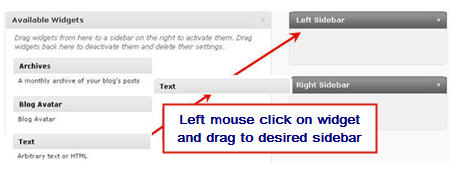
10. Add a text widget to the desired sidebar by dragging it from the Available Widgets on the left into the Sidebar area on the right.
11. The widget will automatically open — add a title to your widget, paste the HTML code and click Save
- If you want to insert lines for better text spacing you need to add the HTML code <br/ > (means insert line break)
12. When you check your blog you should now see it nicely displayed in your sidebar!
- Belows what it looks like in Larry Ferlazzo’s Websites of the Day… right sidebar
- If you check it out on his blog you’ll see that hovering over the image displays the image title and clicking on the image takes you to the post on the book

Enjoy!
P.S. Don’t share this tip with Larry Ferlazzo as he pays me in chocolate for each image I add to his blog sidebar 😎
If you are enjoying reading this blog, please consider ![]() Subscribing For Free!
Subscribing For Free!
This works so well….and I think my students will be thrilled to see the badge appearing in the class blog. Thanks for your clear directions and fantastic screenshots.
marsha ratzel
@David B. Cohen Absolutely no problem and glad my instructions helped. Congratulations on your Edublog Awards nominations!
Thanks for the “cheat” – worked like a charm, and solves a problem I didn’t even realize I was going to have until I also had a solution! Cheers!
@Chris very nice! Glad my post helped! While I can write the HTML code this is so much faster and easier.
Thanks SO much for sharing this, Sue! It could not have been any easier. Here is what your wonderful post took me minutes to do:
http://baconbytes.wordpress.com/
Thanks again. 🙂
Chris
Thank you so much for this post! You are a life saver!
@alibull For screenshots on my PC I use SnagIT. I don’t think saving it to iPhoto on a Mac will change quality and normally on my Mac I just upload the screenshot I’ve created.
Thank you! I tried it as a screen shot and it worked; will the image be better if I saved it to iPhoto for example, and then did the code thing? I’m going to try it with my next badge!
thanks again.
Thanks so much for this – I am a blogging newbie and am very grateful for any tips!!!!!!!!! My class are loving the blog and the parents too!
Hi Sue
That’s a really cool tip. I always wanted to have both my real picture and my avatar on my blog, but couldn’t figure out how.
Thanks:-)
JC
Hi Sue,
I am sorry I am posting here this problem, but I could not find a place to post it on the correct forum.
I have a problem with my blog, the sidebar is gone and also some images are not visible. I really hope you can help me with this issue since my students can not work the way they were doing it.
Our blog: http://www.angliakids.edublogs.org
Thanks a lot and best regards!
Ana
@angliakids, Sorry for the delayed response — been a busy day.
The issue with the theme is we have updated it and the new version defaults back to no sidebars. I’ve now corrected that by going to Appearance > Theme options and setting it to display a sidebar.
Can you give me a link to a location (i.e. post or page) where images are missing so I can check for you?
@Sue Waters,
Thanks for your response Sue! I am glad it has again the sidebar!
The only image I can not see is the following:
http://angliakids.edublogs.org/category/edulearn10/
Again, thanks a lot for your help!
@angliakids, Glad it is all fine now!
I’m not sure what happen with the image so I’ve re added the link back into your post again for you. Can you check and let me know if okay?
Hi Mrs B, go to Presentation > Sidebar widgets, drag and drop the Sonific snoospgt’ widget to your sidebar and click on the box on the side of it (not that clear, I know).You’ll then see a link that takes you to sonific to start up an account with them.Hemmingway needs fixing up for widgets groher we’ll get onto it asap, thanks for reminding us!
When I first started blogging, I was desparate to learn how to add photos to the sidebar. It took me several years to work it out, and I cheated by putting the flickr widget on one of my blogs, anyway!
The other thing I really wanted to learn was how to add a text link eg We had a ‘blogger of the week’ award each week last year and I wanted to link the student name to their blog from the heading on my sidebar. I did work it out, but I am not good at coding! Thanks for this post though and wished it had been written three years ago!
@murcha, almost any time I write a post or another ‘how-to’ in our Help & Support Manual I reflect the same things — I wish this type of information had been around when I first started blogging.
But the good news is I’ve never stopped thinking that and always hope that the information I share helps others that follow in our foot steps.
Thank you so much for this information- I’m still trying to figure out how to put up the widgets!!! It took me (and I know this is going to sound crazy…but it’s true!!)… 4 days to put up my header and get my background into my blog but I was determined to do it on my own… and I finally did it …but I’m so wiped out now that I can’t think straight… so I’m printing this out- and it will be my cheat sheet!! THANK U soooo much!!
@susanna127, Glad that help. With the widgets just make sure that you read through all the information under the Working with Widgets section on the Help site – http://help.edublogs.org/getting-started-with-edublogs/
Thanks for the informative post. I was trying to link some sidebar images to another page on my site but couldn’t get it to work. I thought the link URL was for WordPress to link to, or find the image in the post.
Your directions are very clear and now my sidebar image links work.
Perfect timing… I was just wondering how to link my images, and knew it was something simple I was missing… like to fill in the ‘link url’….
oh yeah, and thanks for the other CHEAT information which I equally found informative.
I love it! I’ve no idea what the need for it would be yet on my class’ Health Studies blog but I’ll certainly file it away – no doubt the need will arise eventually. Or maybe I’ll ‘invent’ a need for pictures on our sidebar just so we can use your cool trick 🙂
Thanks for another great post Sue!
I had not heard of this cheats method or thought of inserting an image like this before.
I have been referring a lot of people to your guides lately so please keep up your great work!!
Kathleen
@Kathleen McGeady, thanks Kathleen that is one of my cheat methods that I discovered to save myself time that I thought others would appreciate.
Thanks for the nice words as always!