
You’re probably familiar with the range of free, web-based tools offered by Google within its Google Drive service?
These tools include Google Docs, Google Sheets, Google Forms, and Google Slides. They’ve become staples in classrooms, homes, and businesses around the world.
For teachers and students, Google Slides is one of the most exciting and versatile tools on offer.
Maybe you’ve heard of Google Slides and you’re wondering how you can use it in the classroom?
Or perhaps, you’ve dabbled with Google Slides but you’re not sure exactly how it can be used beyond presentations?
Or are you a blogger wondering how Google Slides can complement your blog posts?
This post explains:
How to create a Google Slides presentation
How teachers and students can use Google Slides in the classroom (7 creative examples)
How to embed Google Slides into your blog posts (PDF and video tutorial included)
Using Google Slides in Remote Learning
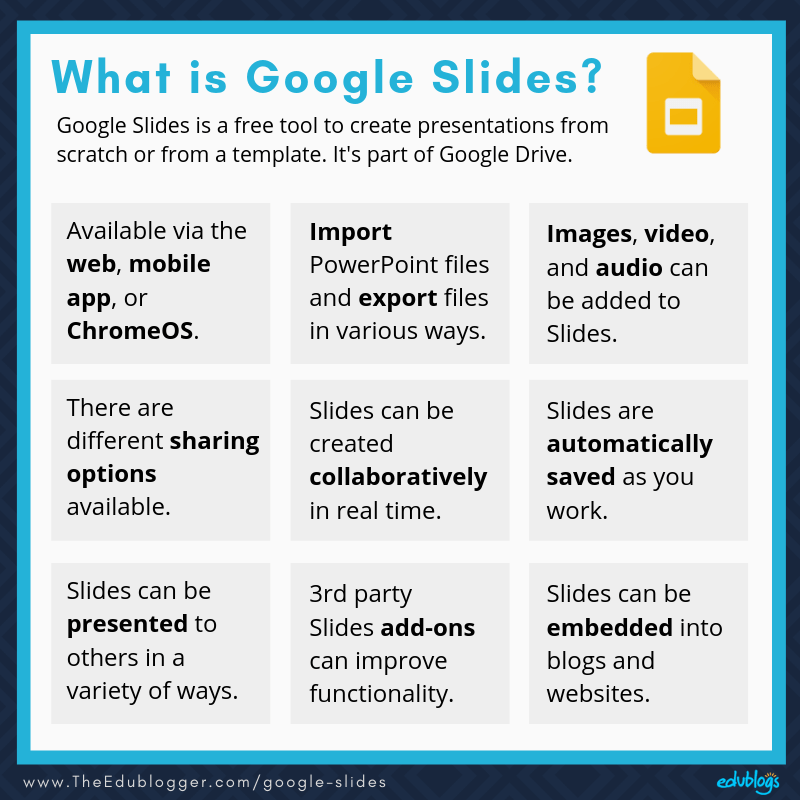
What is Google Slides?
You’re probably familiar with Microsoft PowerPoint — the software used to create and present slideshows?
Google Slides is similar except it’s hosted online and allows for multiple people to collaborate on the same presentation in real time.
Quick facts about Google Slides:
- It’s free.
- You can start with a blank document or use a pre-designed template.
- It’s available via the web, a mobile app (Android, iOS), and as a desktop application on Google’s ChromeOS.
- PowerPoint files can be imported into Google Slides and then edited. Your Google Slides presentations can be exported as a PowerPoint file, PDF, JPEG, PNG and more.
- Images and video can be added to presentations.
- There are many sharing options for your Google Slides presentation. It can be private, you can share it with select people, or you can share it publicly on the web. You can choose whether people can view or edit your presentation.
- If you’re collaborating with others on a Google Slides presentation, you can chat, leave comments, and work simultaneously on the same presentation.
- Your work is automatically saved as you work on your presentation.
- You can present your slides within the platform (View > Present). You can either plug your computer into a screen or use Chromecast or AirPlay to show a live audience. You can also present virtually via Google Hangouts.
- You can add real-time automatic captions when you present in Google Slides. Find out more here.
- There are many add-ons available for Google Slides. These are tools from 3rd party developers to add more functionality to Google Slides. Most add-ons are free but some have paid premium versions. Learn more about add-ons by reading Eric Curts’ post: 9 Awesome Add-ons to Supercharge Google Slides.
- Google Slides presentations can be embedded in blogs and websites.
Here’s a graphic summary of the above. Feel free to share it with colleagues who want to learn more about Google Slides.
How To Create A Google Slides Presentation
You’ll need a Google Account to access Google Slides. There’s a high chance you already have one! This is the same username/password you use for Gmail and other Google Products. You might also have a school Google account.
If you haven’t got a Google account yet, you can sign up here:
https://accounts.google.com/signup
Google Drive is the place where your Google Slides presentations are stored. It’s also one of the ways you can start a new Google Slides presentation.
You access your Google Drive on the web through this URL:
Click on New in the top left-hand corner. Then click on Google Slides and either Blank Presentation or From a template.

Other Ways To Start A New Google Slides Presentation
- You can go straight to your Google Slides collection to view past Slides and create a new one using this URL https://docs.google.com/presentation
- In late 2018, Google introduced some new shortcut URLs to start new Google Slides. You simply type these into your browser to start a new Slides presentation. They are:
- slide.new
- slides.new
- deck.new
- presentation.new
- You can also start a new Slides presentation in the app (Android | iOS)
Using Google Slides Offline
To access Google Slides when you’re offline or have poor internet connection, first enable offline access in your Drive settings.
- Go to your Google Drive and click the gear icon at the top right corner
- Select Settings > General and select “Sync Google Docs, Sheets, Slides, and Drawings files to this computer” so you can edit offline.
- You can then right-click on any file in your Google Drive and select “Available offline” from the menu (while connected to the internet).
- You’ll need the free Chrome Google Docs Offline extension to access your offline documents.
Check out the full instructions to access Google Slides offline on any device here.
How To Make A Google Slides Presentation
You’ll notice when you start a new Google Slides presentation, using the methods described above, you have the option to build a blank presentation or work from a pre-designed template.
Whatever option you choose, creating your presentation is straightforward.
Here are the basics of creating a Google Slides presentation.
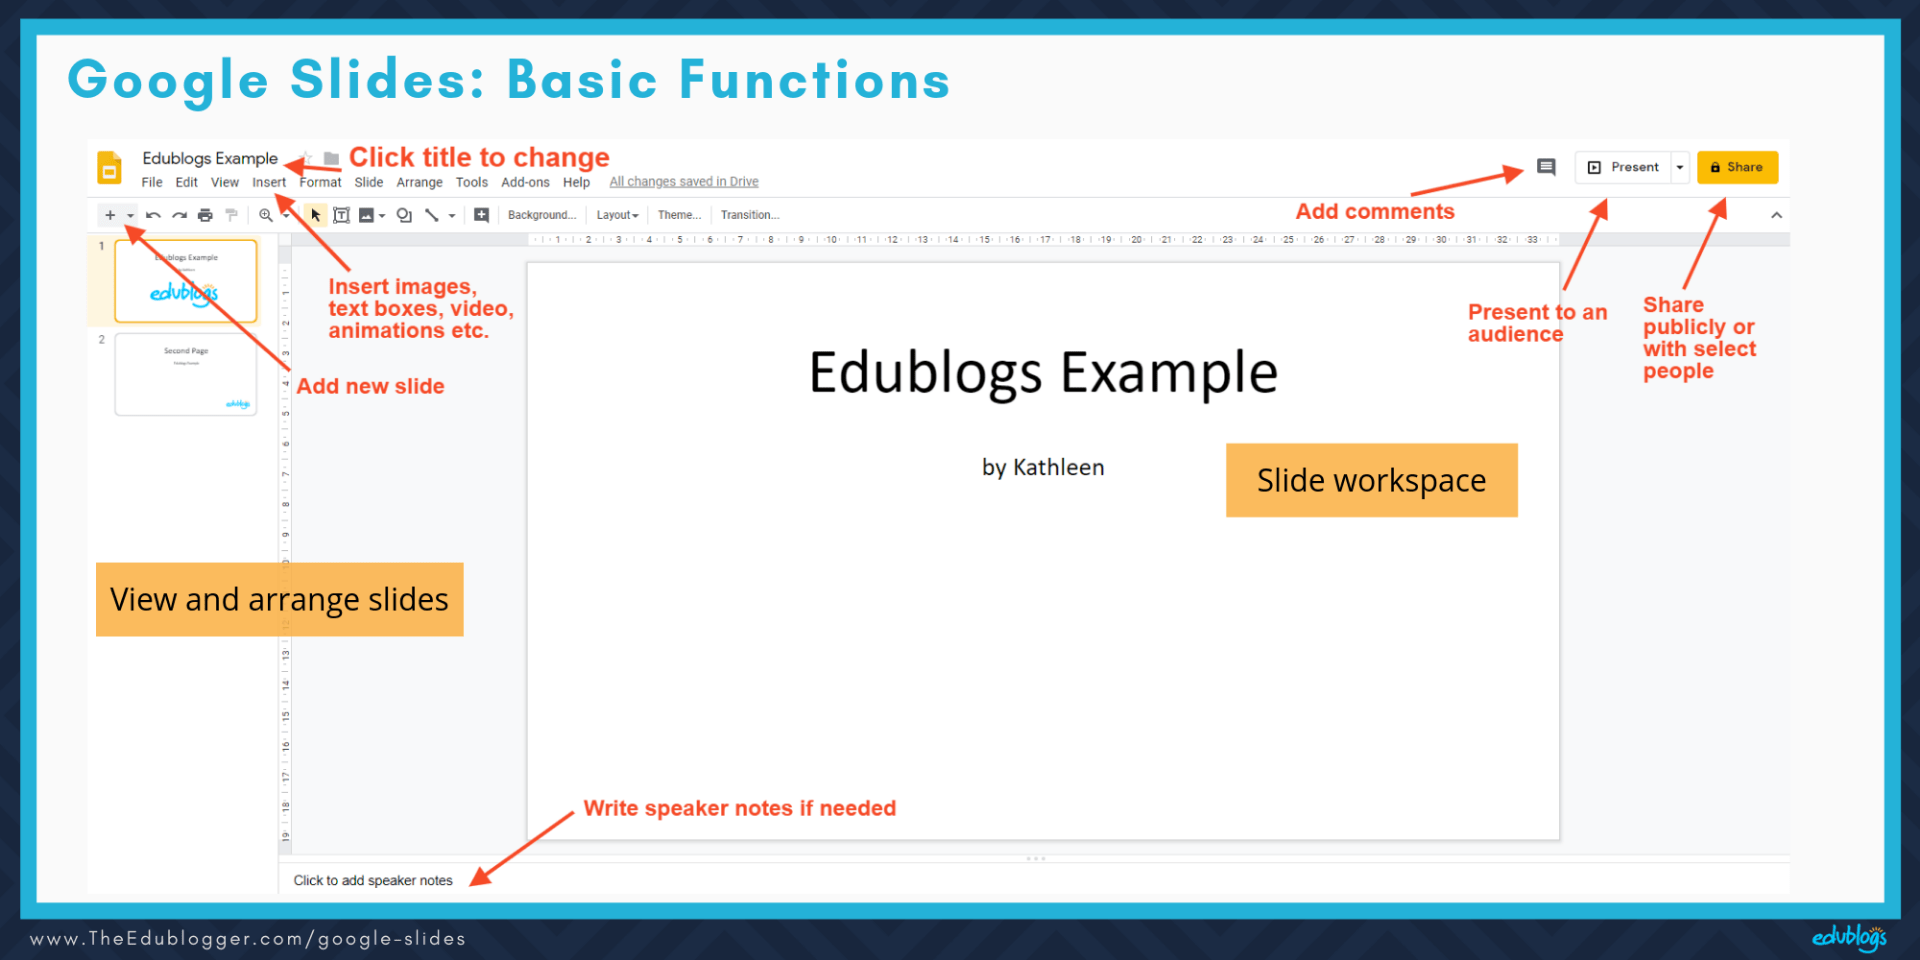
- You add text via text boxes which you can drag around to suit.
- You then insert other elements via “Insert” on the main toolbar. These elements include:
- images
- video
- audio
- shapes
- tables
- charts
- diagrams
- word art
- animations
- Use the + button on the top left to add a new slide
- Right-click on your slide on the left navigation panel to duplicate it (this can be easier than building a slide from scratch). Duplicate is also found under the “Slide” menu.
This diagram shows the basic functions you will use most with Google Slides. Feel free to share it with your students or colleagues.
Click on the image to enlarge it.
Learn More About Google Slides
Learn more about getting started with Slides with the Google Workspace Learning Centre.
“Get started with Slides” is an easy to follow tutorial that’s suitable for both teachers and students.
Video Tutorials: Google Slides Overview
This two-minute video tutorial provides a simple overview of Google Slides basics.
After a more detailed video? Check out David Lee’s 12-minute introduction to Google Slides.
Add Audio To Google Slides
In April 2019, Google began rolling out the ability to add audio to Google Slides presentations. This long-requested function could be very handy for teachers and students.
Audio can be great for reflection, narration, feedback, and all sorts of creative projects.
Want more examples of how audio can enhance Google Slides for teachers and students? Kasey Bell has written a blog post that shares 25 Ways to Use Audio in Google Slides Projects.
Although the ability to add audio is a great new feature, you can’t record audio directly into your Slides presentation.
As Eric Curts explains,
You see, even though we can now add audio to a Google slideshow, there isn’t a simple built-in recording button. Instead you need to record the audio separately with another program, then save it to Drive, and then add it to a slide.
Thankfully, Eric has put together a helpful collection of Free and Easy Audio Recording Tools for Google Slides.
The tools Eric recommends to make audio recordings are:
You can find out all about this process and how exactly you insert audio into Google Slides in Eric’s blog post, podcast, or video.
Using Google Slides In The Classroom: The Basics
The simplest and most obvious way to use Google Slides is to create a slide deck. That is, a collection of slides put together to form a presentation.
A slide deck is used to support an oral presentation.
There are many times when teachers or students might need a basic slide deck:
- Teachers can create a slide deck to support the lessons they’re presenting to students.
- Students can make a Slides presentation to accompany an oral presentation that’s part of their classwork.
- Students or teachers can create slide decks when they need to showcase learning or share school programs (e.g. information evening, school assembly, parent-teacher night, etc.).
- Teachers can collaborate on a slide deck for a conference or staff meeting presentation.
Apart from these basic uses, there is so much more you can do with Google Slides.
Let’s take a look…
7 Creative Ways To Use Google Slides In The Classroom
Kasey Bell isn’t wrong when she calls Google Slides the Swiss Army knife of Google Workspace. Let’s take a look at some creative ways you could use Google Slides in the classroom.
1) Introduce Your Class
Alethea Vazquez is a teacher who participated in the Student Blogging Challenge with her students a number of times. Her students collaborated on a great Google Slides presentation to introduce themselves on their class blog.
In this post, Alethea explains how she carried out this process. It involved giving students a Slides template that they could edit.
Take a look at the end result. This is perfect for an About page on a class blog.
2) Make Choose Your Own Adventure Stories
Remember those Choose Your Own Adventure books that were popular in past decades?
Creating a similar style of “interactive fiction” is a creative way to use Google Slides. It includes a certain amount of planning as teacher Kevin Hodgson explains in this post.
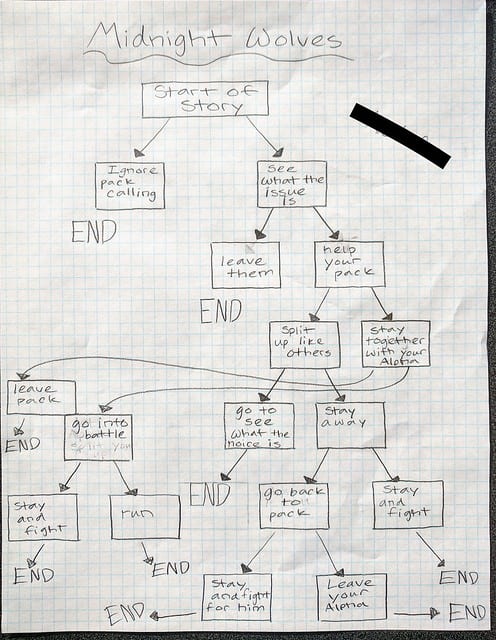
Here’s an example of interactive fiction using Google Slides by Kevin Hodgson. He shared this on his class blog as an example for students.
Tutorials For Choose Your Own Adventure Stories
- Check out this post by Eric Curts for a detailed explanation
- Jake Miller has made a useful GIF to explain the instructions
- This resource from Google explains how to make a collaborative “If-then Adventure Story”
As Kevin Hodgson says,
Most of my students really enjoy this writing, as it is very different from traditional pieces we do, but a few do struggle with the unconventionality of it. That’s OK, too, for what I am trying to show them is that writing is not one form, but many forms and always adaptable.
3) Try Collaborative Storytelling And Research
Two students in Linda Yollis’ third grade class collaborated together on a Google Slides presentation for the Student Blogging Challenge.
They shared their experiences of traveling to London with their own families and included some great research.
4) Compile Individual Slides Into One: Poetry Example
Sometimes you might want students to all contribute one slide to a group presentation.
There are two ways to do this:
- You can start a new Slides presentation and share this template with the class. You would assign a slide number to each student. You just need to make sure students don’t interfere with other students’ slides.
- Or, you can have students create their own new Slides presentation and then share their completed slide with you. You can then compile all slides into one group Slides presentation. These instructions from Erintegration explain how to do this.
5) Share Photos Of Work That’s Not Digital
Google Slides doesn’t have to just be used to share digital work. It can be used to share and present any work students complete in the classroom.
6) Flip Your Classroom: Create A Self Guided Lesson
Google Slides is a great way to help someone work through a lesson, either in a live classroom setting, or in their own time.
You’ve probably heard of the term “flipped classroom”? This is where students can learn content outside of the classroom freeing up face-to-face class time for rich discussions, projects, collaborations and so on.
Teachers can prepare Google Slides presentations that walk students through lessons. Students can work through these presentations at their own pace and in their own time. A similar model can be used for staff professional development.
7) Make Images
Google Slides offers a blank canvas where creations can be download into image formats like JPEG and PNG.
For those reasons, it’s a great way for students and teachers to make images that they can print or use digitally.
Examples of images you could create in Google Slides:
- Blog headers
- Other blog images (e.g. see the example of the promotional graphic at the start of this post. These are great to share on social media).
- Certificates
- Comics
- Photos with captions
- Flowcharts, mindmaps, or other graphic organizers
- How-to tutorials
- Classroom labels
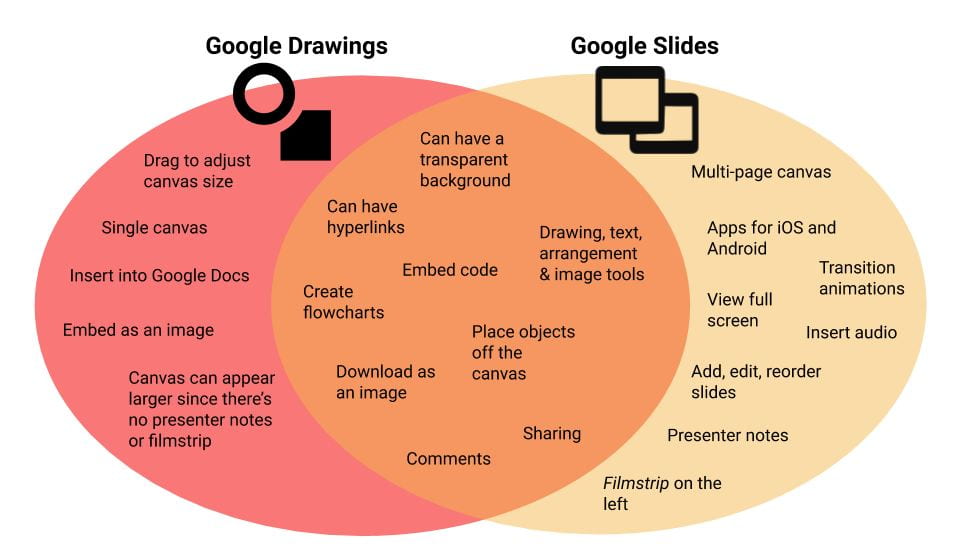
Note: Another option for making images is Google Drawings. In this Venn diagram, Tony Vincent shows us how Google Drawings and Google Slides are the same and different.
Be sure to follow Tony on X or Instagram as he often shares tips for using Google Slides and other tech tools.
How To Make A Graphic Or Image Using Google Slides
#1 Open Google Slides
You can work with a blank presentation or a template.
#2 Change your image size (optional)
If you want your image to be a certain size (e.g. the size of your blog header), you can change this in File > Page Setup > Custom. You can enter the dimensions you’re after in inches, centimeters, points, or pixels.
Tip: If you’re making a blog header, you’ll find the required dimensions in Customizer as demonstrated here.
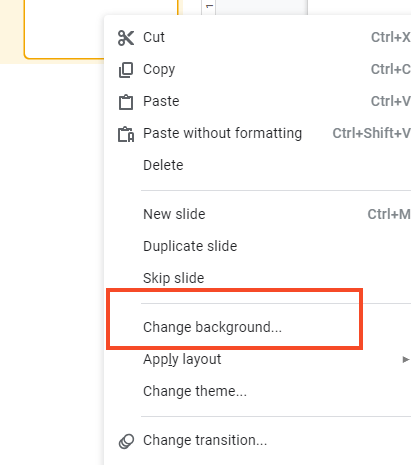
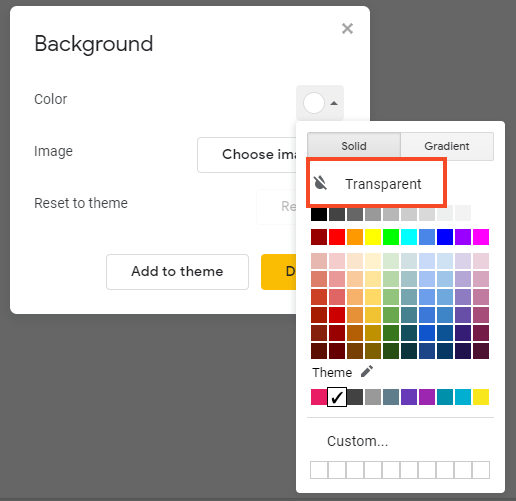
#3 Make your background transparent (or another color)
If you want your image to have a transparent background, click on File > Change background.
Then choose Transparent (or another color).
If you select a transparent background, there will be no background when you download your image as PNG or JPEG.
#4 Create your design
Add the text, images, and shapes that you’d like on your design.
Tip: If you want to experiment with a design element but you’re not sure if you’ll like it, duplicate your slide before making your changes. Then you can choose the one you like best.
Right-click on the slide in the navigation panel and select “Duplicate slide”.
#5 Save your design as an image
When you’re ready, go to File > Download as > JPEG image or PNG image. Save your image to your device. 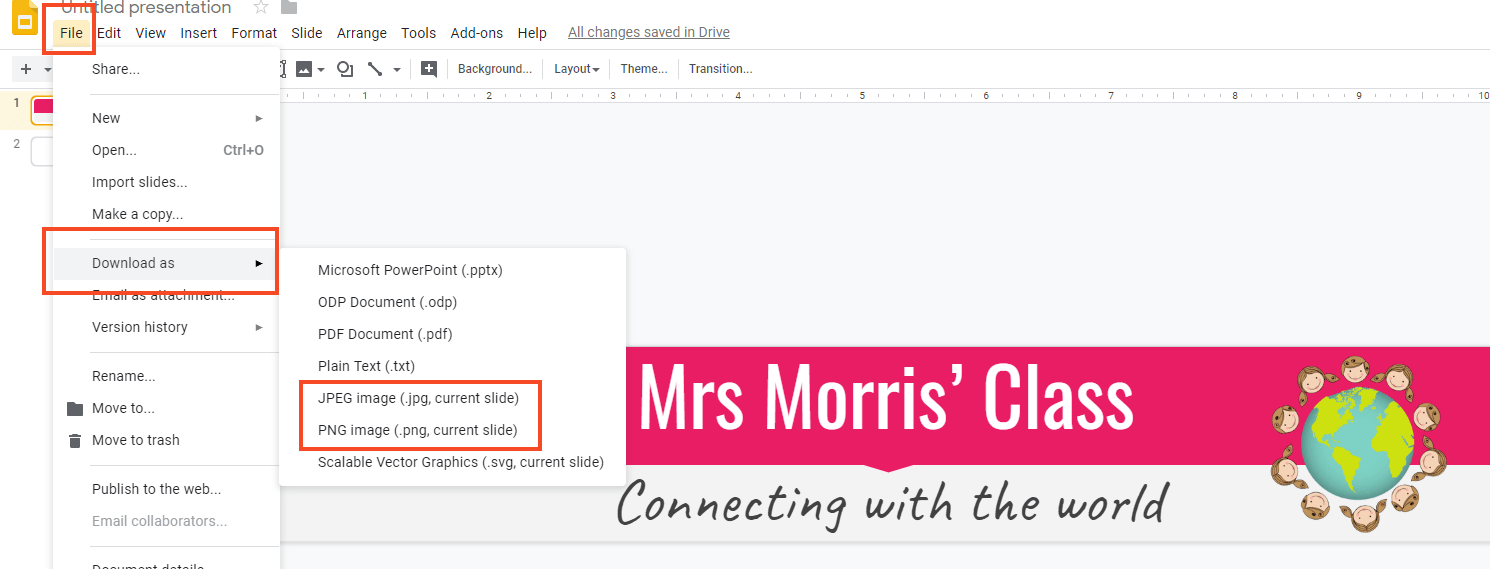
You’ll then have an image file that you can print or use in your digital creations.
Here is a simple blog header image made with Google Slides by modifying a template.

These 7 examples are only the tip of the iceberg of ways you could use Google Slides in the classroom.
We’d love you to share your own examples in a comment. Scroll down to find the comment box.
How To Embed Google Slides In Your Blog Post Or Page
As you’ve seen, Google Slides can be used in so many different ways. You can amplify this learning even more by sharing your work with an authentic audience on your blog.
Google Slides presentations can be easily embedded in blog posts or pages using HTML code (don’t worry if you’ve never done this before — it’s easy).
Note: If you’re using Edublogs, you’ll need Edublogs Pro or CampusPress in order to embed HTML code. This is to prevent misuse by spammers.
Let’s take a look at how to embed a Google Slides presentation into a blog post or page. You’ll find the written instructions below and then a video and PDF version.
This is a two-step process. First, you need to get the embed code from your Slides presentation then add it to your blog.
Step One: Get the embed code for your Slides presentation
1) Open your Slides presentation
You can go to your Drive or directly to your Slides collection to find your presentation. Double click on the presentation to open it.
2) Publish to the web
Go to File > Publish to the web
You’ll find File in the top left-hand corner of your page.
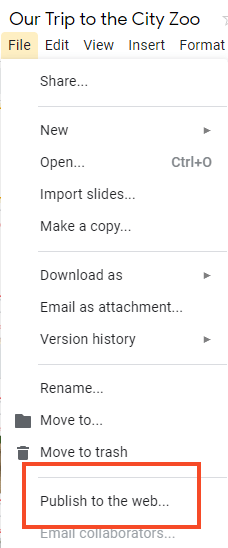
Click on Embed. There are a few options to control the size and speed of the slides. Changing these options isn’t essential (medium is usually a good size).
Click on Publish.
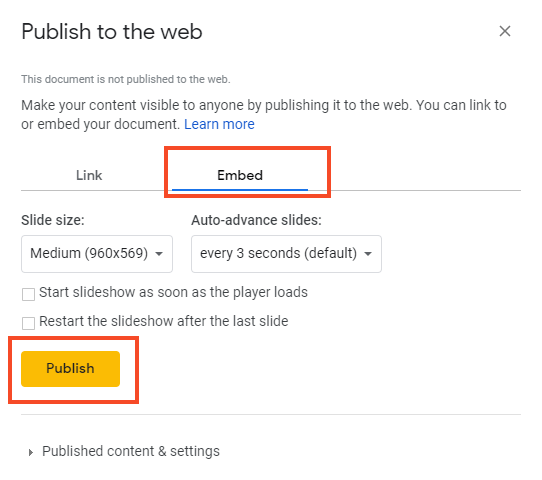
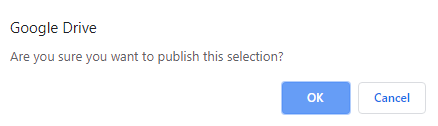
You’ll receive a warning that you’re about to publish to the web. Press OK.
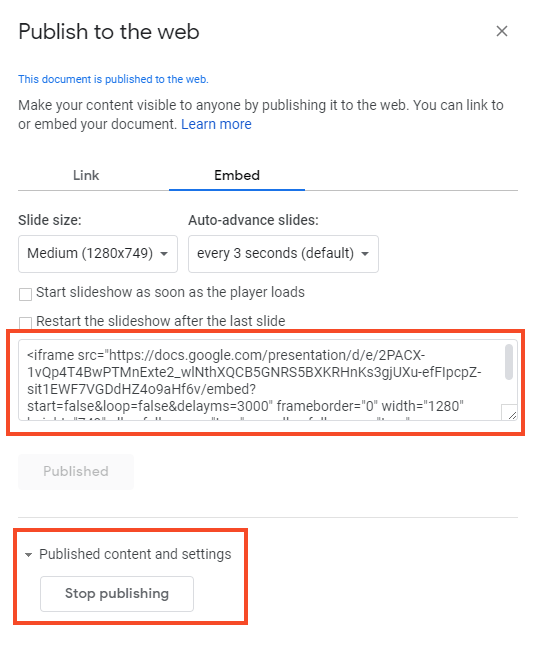
3) Copy the embed code
After you press OK, your HTML embed code will appear in a box. You need to copy this code to add to your blog post or page.
How to copy:
- Click on the text to highlight it if it’s not already highlighted
- Press Control C (Windows) or Command C (Mac)
- Alternatively, right-click and press Copy
Note: If you ever want to unpublish your Slides presentation so it’s not available on the web, repeat these steps and click on the small arrow at the bottom of the box that says Published content and settings. Select Stop publishing.
Step Two: Add the embed code to your blog post or page
These instructions show how to add your Slides presentation to a blog post. The same process applies to pages.
1) Open your post
Go to your blog dashboard and open the post you’re working on. Or, go to Posts > Add New.

2) Add Media
Place your cursor where you want the Slides presentation to appear and then click on the Add Media button.

3) Insert Embed Code
In the Add Media window, click on the Insert Embed Code tab on the left.
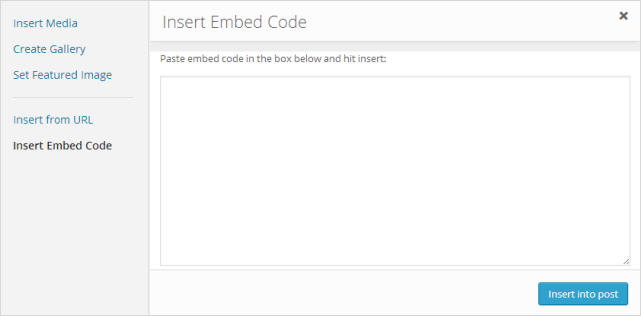
4) Paste Embed Code
Paste the embed code into the Insert Embed code box.
How to paste:
- Press Control V (Windows) or Command V (Mac)
- Alternatively, right-click and select Paste
 Click Insert Into Post.
5) Publish
When you’ve finished writing your post, click Publish.

You should now see your embedded Slides presentation when you view the published post. You can also preview your post to see what it looks like before publishing.
Here’s an example of an embedded Google Slides presentation.
Video: How To Embed A Google Slides Presentation
This 3 minute video takes you through the process described above.
PDF: How To Embed A Google Slides Presentation
You’re welcome to print this 2 page PDF to show your students or colleagues how to embed their Google Slides presentation into a blog post or page.
>>Click here to download a copy of the PDF

Using Google Slides In Remote Learning
If you’re teaching remotely, you’ll need to offer your students a planner or lesson descriptions.
Some teachers put their planners in a Google Slides presentation.
Don’t forget to add these Slides presentations to a blog, LMS, or website so they don’t get lost).
- You can include text, links, and videos of yourself teaching to a Slides presentation amongst other things.
- One major benefit is you can copy and edit your planner so you don’t have to start from scratch each day.
- Check out this post by Alice Keeler for more advice on using Slides in remote learning.
Here’s an example from US kindergarten teacher Megan Peschke @MeganPeschke). Don’t be put off by the age group. This idea could be adapted for any age!
Click here to view the Google Slides presentation in a new tab.
Instructions for Editing and Using Megan’s Google Slides
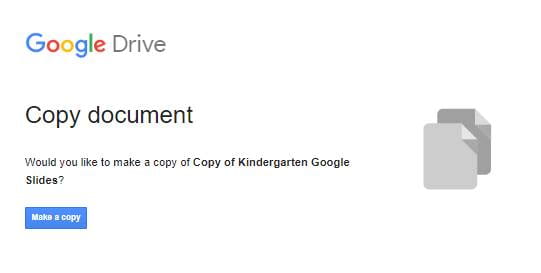
1. Click on this link:
https://docs.google.com/presentation/d/1Bl534rtloR0AjD2wgfLPVrJs2Q6BDS9DEz2G2m9Fzgs/copy
2. You will be prompted to make a copy (screenshot below).
3. The Slides will be saved in your Google Drive.
4. You can edit the Google Slides to suit.
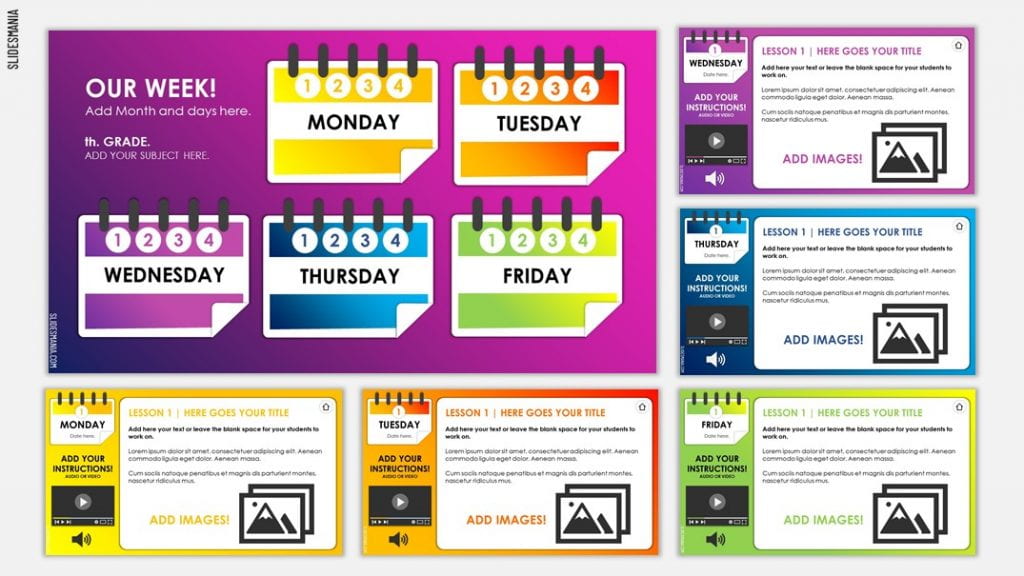
SlidesMania have also published a fantastic free weekly planner template that can be used in Google Slides or PowerPoint. Find it here.
Conclusion
Google Slides is a versatile way for teachers and students to create, collaborate, and present. There’s a lot you can do with Google Slides beyond a standard oral presentation.
Many teachers and students enjoy embedding their Google Slides presentations into a blog post or page. Sharing work with an authentic audience yields many benefits!
Further Reading
You might also be interested in reading:
A Beginner’s Guide To Google Photos
Canva In The Classroom: Getting Started, Example Designs, And Tips!
Six Tools To Create Interactive Learning Content On Your Blog
I love using Slides. I sent a Google slide presentation last week to my students via Google classroom and a few students couldn’t open it. It verified I had shared. Have you heard about this issue before?
Hi! I sent out several google slides for my student to do, alphabet work.
When I go in as him, I can see that he did the activity, but there is no turn in button.
Hi Andrea,
I assume this is a Google Classroom issue? I haven’t used Google Classroom before so I’m sorry I can’t help!
Is there a way to present Google Slides on individual student chromebooks through Google so that I am controlling the pace of the presentation?
Good question, I’m unsure about that, however, there are lots of users on Twitter who might know. If you use Twitter you could try reaching out to someone like @JakeMillerTech @EricCurts. They’re great with things like this.
Good luck!
Once you learn how to use Google Slides, I have a whole section about the other useful features of Google Suites – Work smarter not harder
http://asoundmind.edublogs.org/2019/04/03/ingenuitys-arts-education-conference-resources-4519/
Good Source to learn Google Slides!
Great for students trying to learn google slides, simplifies the entire process and just makes it so much easier to understand.
this is such a great source to help with google docs lots of descriptions and videos.
What an awesome resource! Is it ok if I share the link this information with my staff during a tutorial on Google Slides? Please and thank you!
Hi Jean,
We appreciate any sharing.
Thanks!
This is a great introduction to google slides! I can definitely use the directions for adding google slides to a blog! This should make it much easier. Thanks!
Thank you for this great insight. I am currently studying technology and how to effectively implement it in the classroom.
This is very helpful and informative especially since I am currently taking a computer class.
So glad it helps!