
Google Photos is my favorite photo and video sharing and storage service.
My phone is set to automatically upload my photos to Google Photos when I’m connected to WiFi. Running out of storage on your phone is a thing of the past!
With Google Photos, I can access my photos across all my devices (phone, tablet, computer).
You get unlimited storage for free. You can pay if you want your photos stored with the original resolution but you’ll probably find the standard high-quality free version is fine. The images are just slightly compressed.
Google Photos is packed with numerous features that help me organize, use, and manage my photos.
To get started with Google Photos, download the free app from the App Store or Google Play Store and start uploading. You’ll note from the user reviews how popular this tool is!
There’s also a web version of Google Photos for uploading pictures and videos that are stored on your computer. If you already have a Google account (such as Gmail) you’ll have access to Google Photos.
Below is a summary of my favorite Google Photos features which I’ll explain in detail in this post.
- Google Photos Search
- Google Photos Assistant
- Embed Google Photos
- Embed Google Photo Album
- More Quick Tips
- Free Up Space
- Include Old Photos
- Add Partner Account
- Worried About Safety?
Google Photos Search
Google Photo search uses some complex image processing techniques to group photos together which makes its search incredible and very accurate!
This is handy when searching for finding photos you want to use or show others.
1. Click on the Search field at the top of Google Photos.

2. This loads the search window which lists recent searches, photos grouped by person, by media type and location.
For example, clicking on a photo of a person pulls up any photo you’ve uploaded to Google Photos with them in. Note: you can name the faces of people for easy future searching too (or use a nickname). Simply tap “Who is this?” located at the top of a face group.
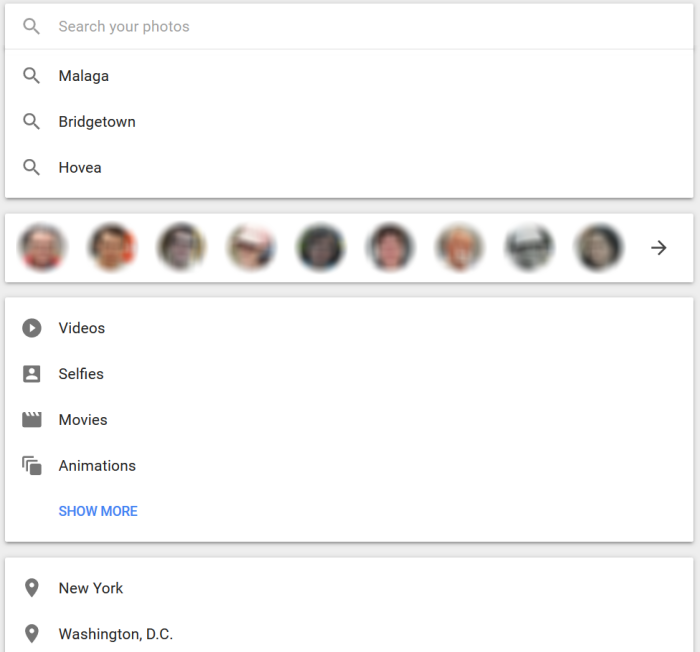
3. Enter your search term.
Google Photos Assistant
The Google Photos Assistant enables you to easily create albums, collages, animations, and movies.
Go to https://photos.google.com/assistant on the web, or tap on the Assistant icon at the bottom of your app.
From there you’ll be able to easily create something or explore the albums, collages, animations, and movies that have already been created for you.
Album examples:
- Saturday in Manjimup and Bridgetown — text added so you can see how a story can be created.
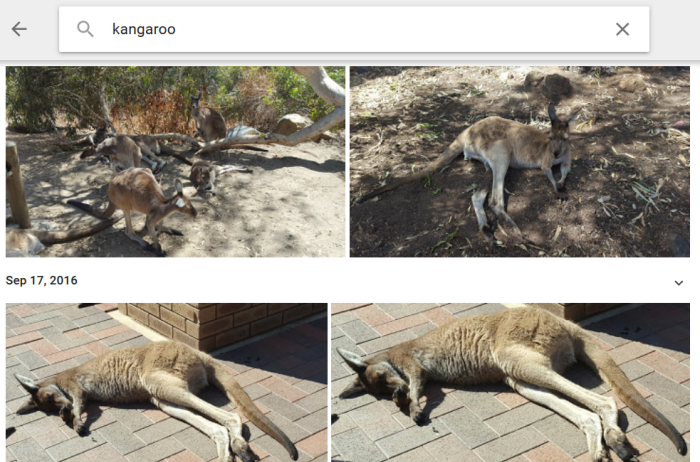
- Kangaroo Photos — for those like me who love looking at kangaroos.
A collage created from Walking with Giants photos taken from their visit to Perth in 2015.

Google Photo Assistant can be used in so many different ways! You could share memories of learning or excursions on your class blog. Or perhaps you’d like to make a special video for a friend or family member. The possibilities are endless.
Embed Google Photos
Want to embed a video but don’t want to upload to YouTube, like my video of dolphins in the Swan River?
Would you like readers to be able to zoom in easily on a photo? Like my photo of my Ockerby ancestry below compiled by Rev Thomas Ockerby Hurst (my great-grandfather) in 1939.
You can do both by embedding Google Photos into your website.
How To Embed Google Photos Into Your Blog Or Website
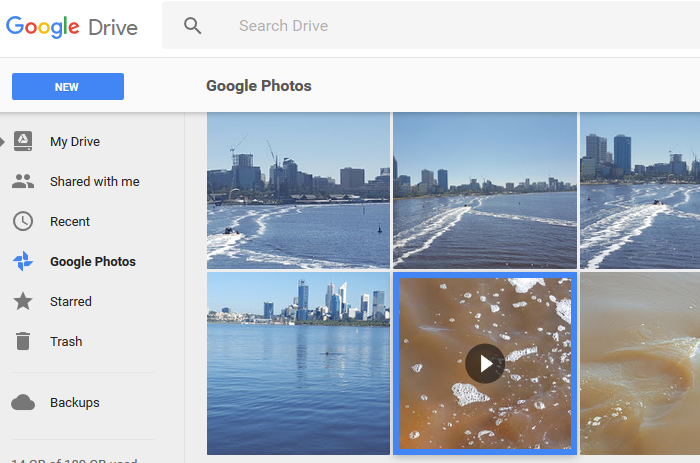
1. Log into Google Drive in the web browser on your computer using the same Google account you use for Google Photos.
2. Click on Google Photos folder in the left sidebar (photos and videos are automatically added to Google Drive).
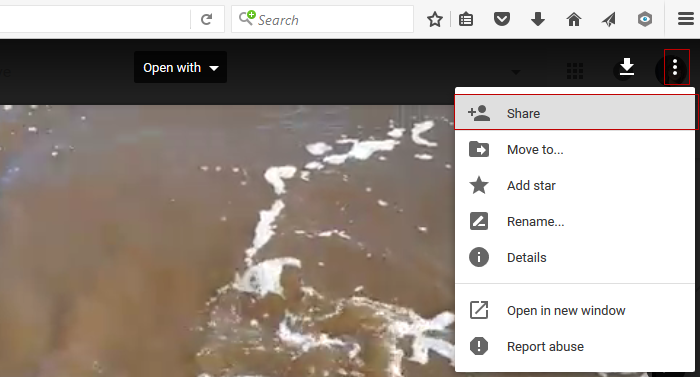
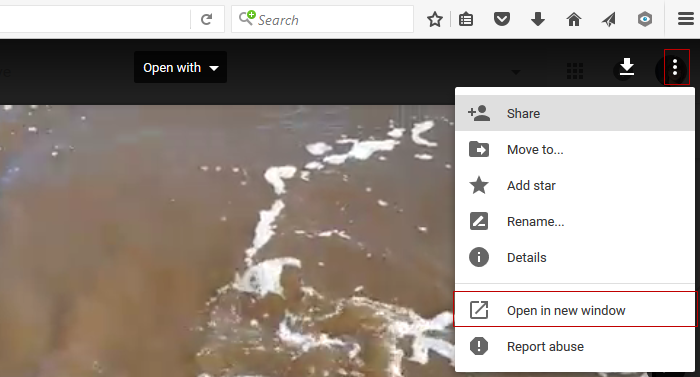
3. Click on the video or photo you want to embed and then click on the More icon and select Share.
Videos take some time to upload to Google Drive from Google Photos. If the video has only recently backed up to Google Photos it mightn’t appear for a while in Google Drive.
4. Click on Advanced option in the Share window.
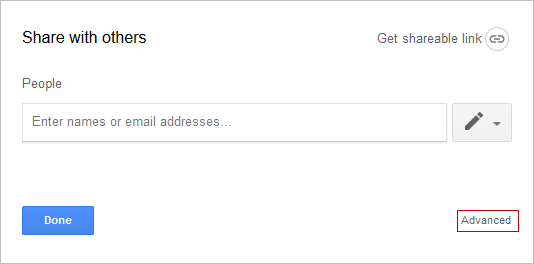
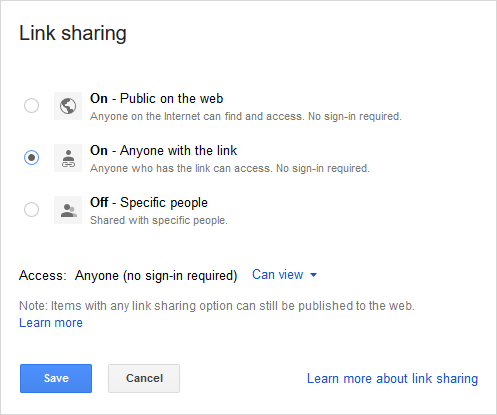
6. Click on Change next to Private.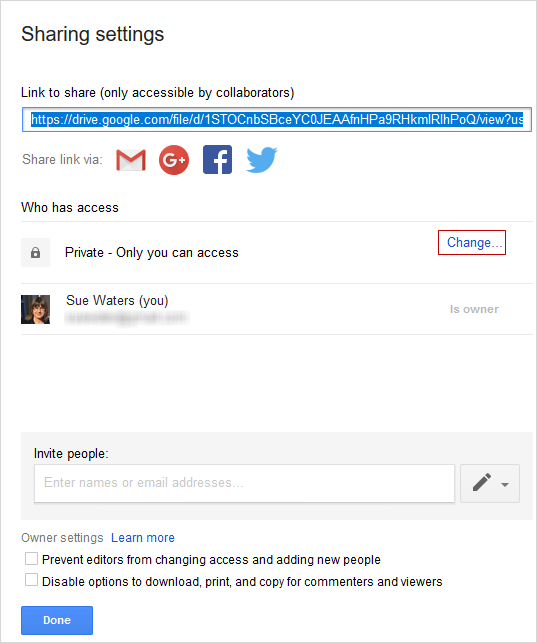
7. Click on On – Anyone with a link or On – Public on the web and then click on Save.
8. Click on Done to close the Share window.
9. Click on the More icon and then Open in new window link.
10. Click on the More icon in the new window and select Embed item.
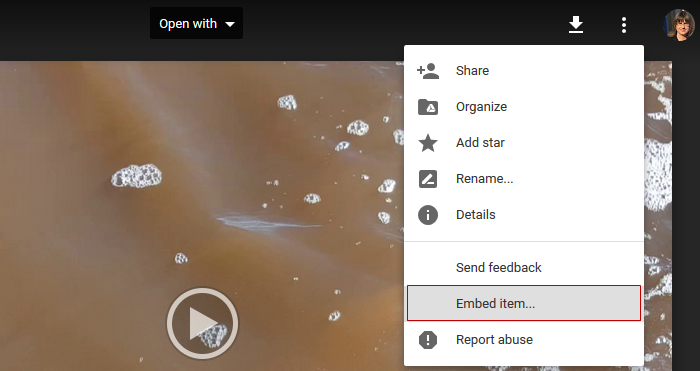
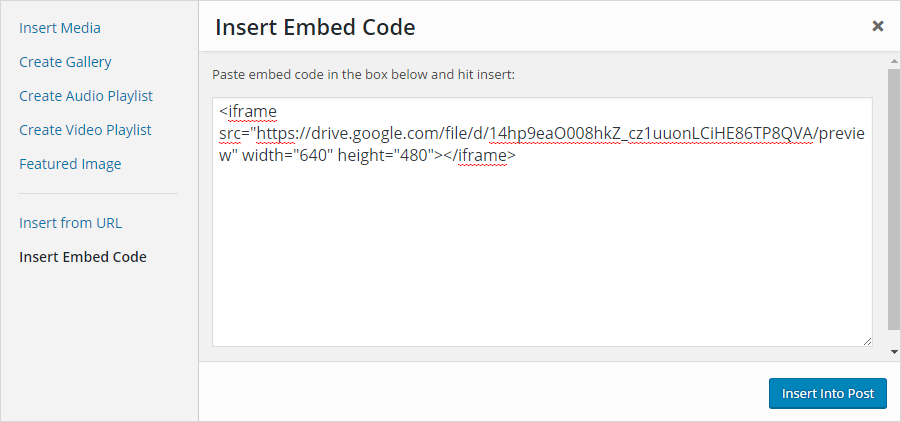
11. Copy the embed code.
11. Paste the embed code into your post using Insert Embed Code in the Add Media Window and then click Insert Into Post.
The method you use will depend on the website or blog platform you use. This is how you do it on Edublogs and CampusPress networks.
12. Once your post is published you’ll see your photo or video embedded.
Embed Google Photo Album
Here’s how to embed a Google Photos album:
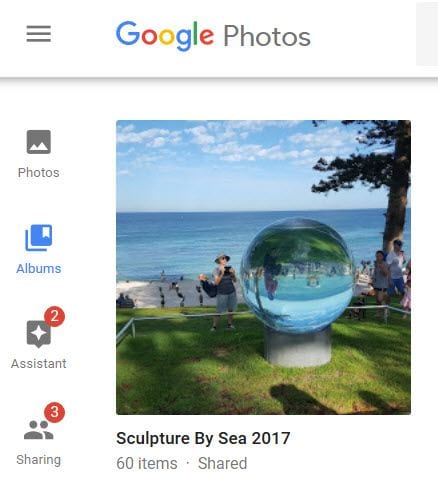
1. Log into Google Photos on your computer.
2. Click on the Album you want to embed.
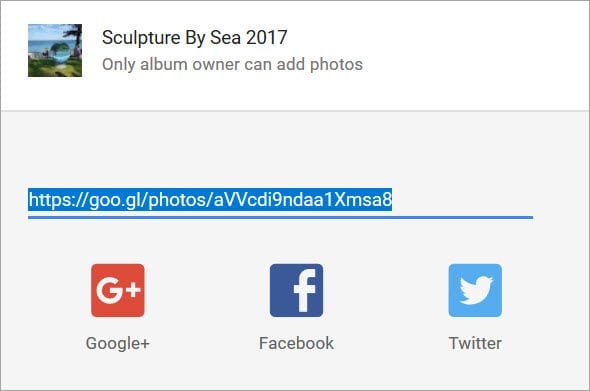
3. Click on Share icon.

4. Click on Get Link.

5. Copy Link.
6. Go to Publicalbum.org
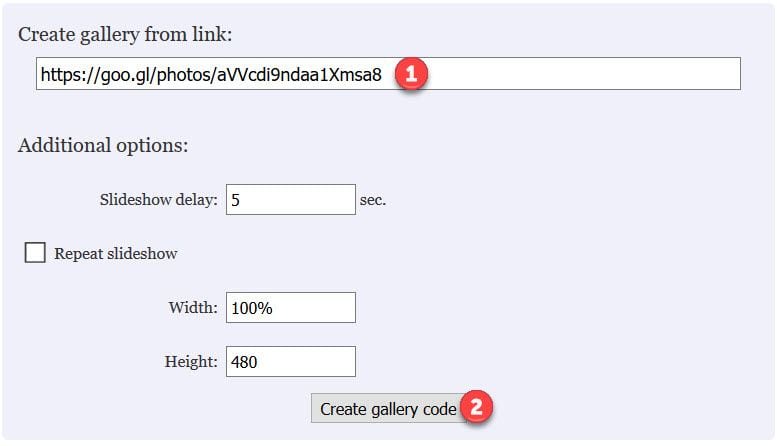
7. Paste your Google Albums link into 1) Create gallery from link and click 2) Create gallery code.
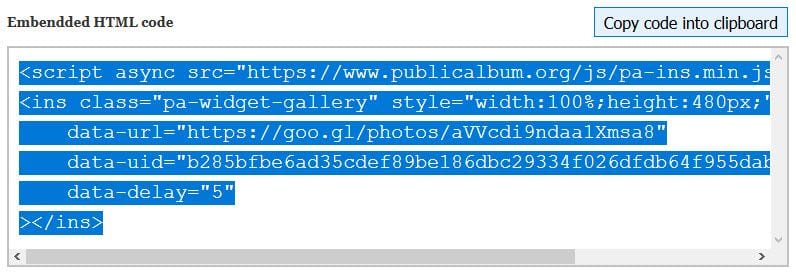
8. Click on Copy code into clipboard to copy the embed code.
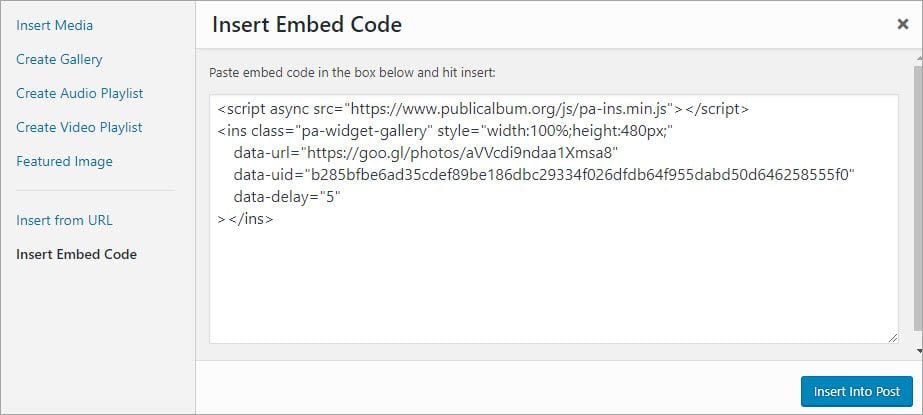
9. In your blog dashboard, click on Add Media > Insert Embed Code. Paste your code and then click Insert into Post.
The method you use will depend on the website or blog platform you use. This is how you do it on Edublogs and CampusPress networks.
10. Once the post is published you will see the album embedded as a slideshow.
Google Photos Album Embed Examples
Below are two different examples of embedded Google Photos albums so you can see what the embed looks like.
My photo album from Sculptures by the Sea.
My photo album of the Western Mail Centenary Number (1828 to 1929)
Viewing this slideshow on a mobile device allows you to zoom in to read the text.
“The Western Mail” Centenary Number publication which was published in July, 1929 to commemorate the 100 years of the founding of Perth and the establishment of the Swan River Colony, the first permanent European settlement in Western Australia.
The 80 page publication highlights the development and history of Western Australia from 1828 to 1929 in Perth and country towns. It includes photos from the 1800s to 1929 comparing changes in the city, towns, Parliament, transport, sport, fashions, primary production. The publication was sold for 1/6 in July, 1929.
It’s packed full of content that could be used with students and will be helpful for those interested in history.
More Quick Tips
Free Up Space
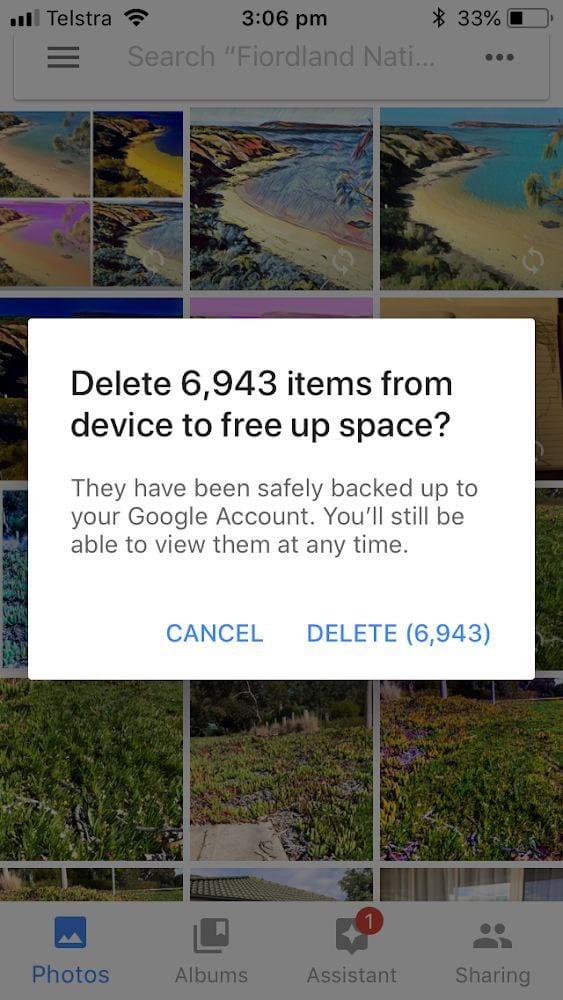
Many people find that one of the biggest advantages of Google Photos is freeing up space on your phone. No more frustrating “storage full” messages just as you’re about to capture a precious moment in time.
Once your photos are backed up in Google Photos, you can free up space on your phone by going into settings in the Google Photos app and selecting Free up space.
You’ll then get a pop up telling you how many items can be deleted from your phone. Remember, you’ll still be able to access these photos at any time via Google Photos. They’ll just be gone from your phone’s camera roll.
Include Old Photos
If you have albums or shoeboxes full of old photos lying around the house, it can be a good idea to digitize these and safely store them online.
You can use an app like PhotoScan by Google Photos to take high-resolution, glare-free images which can then be backed up to Google Photos along with your more recent photos.
Just search for PhotoScan in your App Store.
Add Partner Account
If there are specific people you always share photos with (e.g. sharing photos of children with your partner), you can add them to your Google Photos account. Simply go into settings in the app and tap on Add partner account.
You’ll then be prompted to enter your partner’s email address and choose what you want to share. This could be items from a specific date or photos of a specific person.
You can change or turn off these settings at any time.
Worried About Safety?
If you’re unsure about your Google account being jeopardized, you might consider turning on 2-step verification. This means you’ll enter your password as normal and then be asked to enter a code that’s sent to your phone.
Want to learn more about passwords? Check out — Updated Password Advice: What Teachers And Students Need To Know.
Just go to Google’s 2-Step Verification page to set up this extra security measure.
Any Tips or Questions?
I hope this information helps you organize, store, and share all your photos and videos!
Please leave a comment below to provide tips on using Google Photos or let me know if you have any questions.
This is helpful thanks
Thanks Sue Waters. It is a helpful post for me. I faced some problems when I want to search photos through google. From now I think I will be able to manage this.
Sue, perhaps a good WordPress plugin for bloggers might be very useful. I am a Google Photos user myself and crave for a robust and solid plugin that can import my photos into my WordPress blog. This way, we can use the Google Photos Cloud to host the pictures and still display on our blog.
Thats cool