Instead of ‘Where’s Wally’ we’ve had a case of ‘Where’s Sue?’
Sorry but I’ve been really busy writing bi-weekly posts on our Teacher Challenge blog.
So I’ve decided that you’d might like to see that types of posts and activities we’ve been doing on Teacher Challenge blog by cross-posting our post on Enhancing posts with images here.
I’ve kept the post as is so you can see exactly how participants are stepped through tasks.
But first I’ll tell you a bit more about the Teacher Challenge!
About the Teacher Challenge
Teacher Challenge blog is where we do free 30 day professional development challenges that step participants through weekly tasks that increase their skills while working together as part of a global community.
The Challenge is open to anyone who wants to increase their skills – blogs are used for reflecting your progress while learning and connecting with each other.
However blogs don’t need to be hosted by Edublogs to participate!*
Participants can complete as many of the tasks as they like and in any order. And if you missed out, it is never too late to work through the challenges at your own pace!
Our first Challenge was 30 Days to Kick Start Your Blogging and here’s where you’ll find the Beginners posts:
- Kick Start Activity 1 – Beginner – Setting Up Your Blog
- Kick Start Activity 2 – Beginner – Effective and engaging blog posts
- Kick Start Activity 3 – Beginner – Introduction to working with pages
- Kick Start Activity 4 – Beginner – Connecting with others
- Kick Start Activity 5 – Beginner – Enhancing posts with images
- Kick Start Activity 6 – Beginner – Enhancing posts by embedding media
- Kick Start Activity 7 – Beginner – Getting more out of widgets
- Kick Start Activity 8 – Beginner – Building readership and blogrolls
Our current Teacher Challenge is 30 days to get your students blogging
Kick Start Activity 5 – Beginner – Enhancing posts with images
A picture tells a thousand words.
Effective use of images grab your readers attention and encourage them to read your posts.
While a copyrighted image can grab the attention of the person whose copyright you’ve broken — and cause you considerable pain 🙁
In this fifth activity you will:
- Be introduced to copyright
- Learn about using Creative Commons images in posts
- Find Creative commons images and add them to a blog post
- Learn about uploading photos from digital cameras
- Learn about other way of creating your own images
- Write a blog post that includes images
- Visit the Discussion question for activity five
- Complete the extension activity (if you have time).
Step 1: Introduction to Copyright and using Images in posts
You can’t just use any image you like in a blog post.
Why? Because unless stated otherwise the law automatically grants full “copyright” over any creative work a person makes.
And if you’re thinking Fair Use Laws. Forget it!
It’s only really applicable in USA and won’t protect you from the rage that can be unleashed by someone whose copyright has been broken.
So what’s the solution?
- Use Creative Commons images
- Use your own photos
- Create your own images using a range of different tools
Step 2: Using Creative Commons Images in posts
Creative Commons images are the safest way to source images online for blog posts.
Introduction to Creative Commons
Creative Commons, founded in 2001, is an organization which provides free content license known as a creative commons license that people can apply to their work.
When you license your work with creative commons, you are giving people the permission to use it without having to ask permission, provided they use it in the manner stated in your creative commons license.
The reason people use creative commons licenses is to make it easier for everyone to share and adapt creative work without the concern of copyright infringement.
Creative commons licenses are used for books, websites, blogs, photographs, films, videos, songs and other audio & visual recordings.
And for those that are wondering, unless a blogger includes a Creative Commons license, all content on that blog is automatically the copyright of the blogger.
Creative Commons images and Flickr
One of the most common sources of Creative Commons images used by bloggers is Flickr (an online photo sharing website).
Unfortunately many assume Flickr images are licensed under creative commons and allowed to be used.
This isn’t the case; images marked as “All Rights Reserved” are copyrighted and require permission from their creator.
Images marked as “Some Rights Reserved” means a creative commons license applies.
If you look at images directly on Flickr always check to see which license applies to ensure you only use the image in the manner specified by the license.

Here’s a summary of what the Creative Commons license’s mean on Flickr:

Creative Commons and Image attribution
It’s a requirement of all Creative Commons Licenses that you attribute the original author. This means you can’t just use a creative commons image without acknowledging the person who originally created it.
Within or at the end your blog post you must attribute the image and you must link the photo back to it’s original photo page. We’ll show you how to do this soon!
Step 3: Finding Creative commons images and adding them to a blog post
There are several online tools that make searching Creative Commons Flickr photos less time consuming.
Here’s a couple of quick options:
Other sources of Creative Commons images include:
Here’s how to search and add images to posts using Compfight
1. Go to Compfight
2. Change to Creative Commons only, choose whether to search tags or text, add your search term and click Search.

3. Scan through the search results and click on the Photo you like so that you can view it on its photo page on Flickr.

4. Scroll down right hand side of photo page to view License.
5. Hold your Ctrl key and left mouse click on “Some Rights Reserved” to open up the license on a new browser tab to read terms of its license on Creative Commons.
- Only use if license is applicable for your situation.

6. Now select View All Sizes from the drop down Action list and select the size of the photo you want to use.

7. Right click on Image and select Copy Image Location or Copy Image URL (depends on what web browser you are using).

8. Now go to the post you are writing inside your dashboard and click on Add an Image icon

9 In the Add an Image window click on the From URL tab
10. Add the image URL, image title, select the image alignment, add the URL of its Flickr photo page to the Link Image URL field and then click Insert Into Post
- In this example the URL of its Flickr photo page is http://www.flickr.com/photos/53611153@N00/309709280/
- You link to its Flickr photo page as it is a requirement of Flickr’s conditions of use and so that if any one clicks on the photo they can view the original source of the image.

11. Add the photo attribution either below the photo or at the end of your blog post.
- It’s a requirement of all Creative Commons Licenses that you attribute the original author.
- This means you can’t just use a creative commons image without acknowledging the person who originally created it.
- The text below this photo is are examples of how you can attribute an image — look closely at what websites the attributions links to!

Example 1:
Photo by Darwin Bell licensed under Creative Commons Attribution 2.0 Generic.
Example 2:
Original image: ‘a piggy in the middle‘
http://www.flickr.com/photos/53611153@N00/309709280/
Released under a Creative Commons Attribution 2.0 Generic License
Please note:
- Some School Districts block Flickr
- In these types of situations you’ll need to download the photo onto your computer and then upload it to your blog post.
Step 4: Uploading photos from digital cameras
Our digital cameras are designed for printing good quality photos and not for uploading directly into blog posts.
A photo from a digital camera can be as large as 2.4 MB, it’ll unnecessarily use up your blog storage space and take longer to load your image compared to an image that is resized before uploading.
It’s really important to resize them before uploading to your blog post.
The best option is to resize the photo to:
- 450 pixels wide – if you want it to take up the full width of your post area
- 150-200 pixels – to left or right align the image with wrapped text
Here’s some tools you can use to resize your photos:
- InfraView – here’s how you do basic image editing using irfanView
- Picasa – here’s instructions on resizing your photos using Picasa
- Picture Manager – here’s detailed instructions on how to use Picture Manager
- PIXresizer – Here’s instructions for resizing images using PIXresizer.
- iPhoto
Now your photo is resized uploading into your blog post is as simple as:
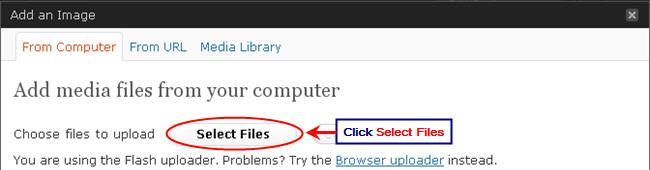
1. Click on Add an Image icon
2. In the Add an Image window click on the Select Files button
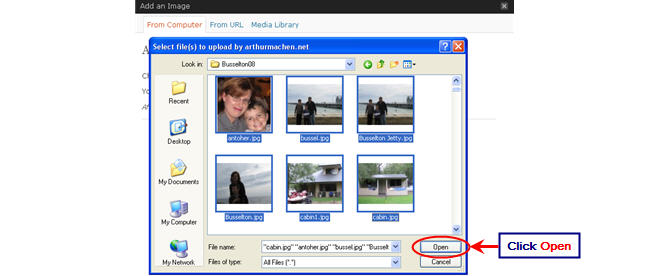
3. Locate the images on your hard drive (use your Shift or Crtl key to select more than one image).
4. Click Open to start uploading the images.
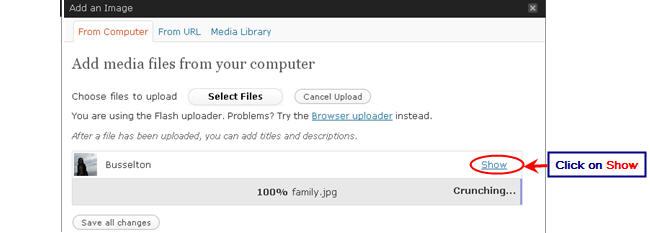
5. While your images are uploading you will see a progress bar.
- If you upload more than one image you will need to click on the Show link to edit the image details and insert an image into a post (see below for instructions for inserting a photo gallery).
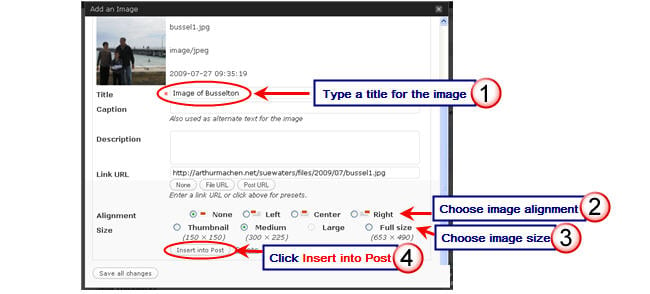
6. In the image option screen you need to (see below for more details on each of these option):
- type a title for the image
- choose how you want the image align (None, Left, Center or Right)
- select size of image you want to insert (Thumbnail, Medium, Large or Full Size)
- and then click Insert into Post
7. Your Add an Image window should be closed and your image should now be inserted in your post.
Step 5: Other ways of creating your own images
Other options for creating your own images include:
- Image Generators such as ImageGenerator.org
- Comic Generators like MakeBeliefsComix.com, kerpoof, ToonDoo
- Photo Editors like Befunky, fd’s Flickr Tools
- Tag Cloud Creators such as Wordle
- Graph Creators including GraphJam and Crappy Graphs
Mixing up your images using these types of tools can really spice up your posts!
We hope you have fun trying some of them out!
Step 6: Write a blog post that includes images
Now we’ve talked about images it’s time for you to show us your skills by writing a blog post that includes images.
Here’s some ideas of what you might like to write about:
- Share what you have learnt about Creative Commons and finding Creative Commons images. Tell us about your favorite sources of Creative Commons images.
- Share your tips of creating your own images.
- Write a review on ways of creating your own images using a range of different types of tools.
- What you’ve learnt from watching how other bloggers use images in their blog posts.
Don’t forget to include images in your blog post!
And remember to leave a comment with a link to your post so we can drop past to check it out! We like to include these links to your posts in our weekly reviews!
Step 7: Visit the Discussion question for activity five
Step 8: Extension Activity – the WOW! factor
Add a photo of your own to befunky or irfanview, use as many of their editing features as possible to change the look of your image completely and give it the ‘Wow’ factor ie the audience who looks at this image would just say ‘”Wow’! How did you do that?”.
Add it to your post and explain what software and features were used.
Final Thoughts
Some readers have commented that blogging in another location is making it harder for them to find my posts. Would love to hear your thoughts?
Would you like us to be cross-posting the posts from the Teacher Challenge blog onto The Edublogger? Would that make it easier?
If you are enjoying reading this blog, please consider  Subscribing For Free!
Wow! Awesome post. This is soooo valuable. Wish I’d seen it long ago. I esp. liked the section on the Creative Commons, and the links you provide are gold nuggets. While there is a ton of info out there on the internet, it’s folks like yourself who help some of us put some of it together and keep us from straying into the mine fields.
Thanks
Hi David, thanks for the nice words and hope this post helps you!
Hi Chenoa, been a bit behind on some work. Apologies for the delay will go to the other comment and post my response.
Hi Sue,
I am sure I left a comment here yesterday about a problem I am having……but now it seems to be gone….? Just wondering if you got it? It was in relation to clearing students blogs from previous years so we can upgrade all our students to Pro.
Thanks heaps, Chenoa
Dear Sue,
This post is yet another demonstration of how gifted a teacher you are. You had to devote much hard work into molding your material in such a well-organized, fact-filled, and superbly-illustrated way.
Thanks for putting together such a lucid post. For someone like me who is not sufficiently oriented to using visuals, this post fits the bill.
Take care.
Dave Lambert (Learning Professor)