Our next posts in our “blog makeover” series provides an excellent opportunity to respond to Dina Strasser suggestion to do:
a follow-up post on how to (and the limits to) customizing widgets. For example, I’d like to include on my sidebar a simple link to my Twitter page (no updates).
It is recommended you read the previous post on Getting more out of Widgets prior to reading this post.
Basic knowledge of HTML provides greater ability for customizing text widgets; means you can embed photos in your side bar, link to pages on your blog or other websites, write text using bold and italics.
What is HTML?
HTML is a bit like RSS, for bloggers there is no need to fully understand it but helpful if we learn the basics of how to use.
HTML is short for “Hyper Text Markup Language” and a language used to tell a browser how to organise the layout of a web page it has downloaded from the WWW e.g. influences if text is bold, italics, a heading, bullet points.
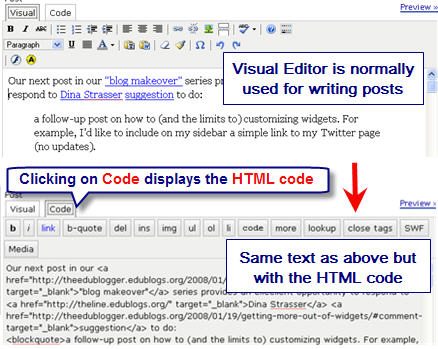
When you write a post or page inside your blog dashboard you don’t worry HTML because the Visual Editor does it for you. If you click on the Code tab it shows the HTML code in your text.
Basic knowledge of HTML is really helpful for tasks like customizing widgets and writing comments on blogs.
Examples of HTML used to highlight text include:
- <strong> tag makes text strong e.g. I <strong>really like</strong> this idea produces I really like this idea.
- <em> emphasizes text e.g. I <em>really like</em> this idea produces I really like this idea.
Notice you must use the < and > symbols around the HTML Tags and the tag is closed using a ‘/’ (slash) in front of the tag keyword e.g. </strong>
Here’s how you can use HTML to add your photo to your Blog Side Bar
<img src=”https://www.theedublogger.com/files/2008/01/question.jpg” alt=”question mark” />
produces
This is how I embedded Larry’s photo on his blog. Personal connection is important for readers — adding Larry’s photo means his readers now know more about who he is i.e. they can visualise him.

Final Thought
As Kevin pointed out:
if you doing a blog maker make sure you write a post to invite your readers to comment on your changes. Readers who read your post via RSS won’t be aware of the change because everything will look the same in their feed reader.
Remember to pop past Larry Ferlazzo’s Website of The Day blog and give him feedback on his makeover!
Dina Strasser request for tips on adding “a simple link to my Twitter page (no updates)” will be covered in my next post.
It does take time to get used to using HTML; the key with technologies is willingness to experiment. As you become experienced with using HTML you will recognise opportunities that can be enhanced with it’s use.
Other posts in our “blog makeover” series include:
- Tips For Doing A Blog Makeover
- Creating Hyperlinks Using HTML
- What To Consider When Choosing Your Blog Theme
If you are enjoying reading this blog, please consider  Subscribing For Free!
Valuable information and excellent design you got here! I would like to thank you for sharing your thoughts and time into the stuff you post!!
Hi Sue,
I am using the Ocean Mist theme and whenever I add a photo to my sidebar or my pages they appear with a red frame/boarder around them. I really don’t like the look of this and have tried to figure out how to remove this but I can not seem to make it work. I was wondering if there is a way I change this so it no longer happens? Any help would be greatly appreciated.
Cheers,
Krista Webb-Scheers
The Classroom Connection
New to all of this…
Tried to get the photo in the sidebar, but no luck. Then uploaded an avatar and followed instructions to put it in the sidebar. All I have is a shadow outline, not my image. Have tried the normal and alternative upload and neither makes any difference. What have I done wrong?!
ps Love what (it looks like) I can do with this and already planning what will go where!!
@barcz, Can you give me your blog URL so I can check? Great to hear you are enjoying blogging.
I can only say, one of the best tutorial I’ve ever found to upload images on the blog post. Thanks
hello
fore more details
I upload my personal picture for my avitar. Then I get the crop option and here is where my problem is. My picture is at the lower left of the browser window and the crop tool is at the upper left. I can not drag the crop tool down anywhere near the image to crop it. In addition, I can not click the “crop” button
If you want to add a personal touch to your computer, then do what other computer vendors do. You can add your company logo or a photo of yourself to your computer.
To see your current ‘Systems Properties’ window, right-click on ‘My Computer’ and select ‘Properties’ from the pop-up window. You can customize your ‘Systems Properties’ pop-up window.
This explains how to add a photo or your company logo to your ‘Systems Properties’ pop-up window.
To start with, open any photo-editing program and create an image 180 X 114 pixels. If you what to use a photo or own company logo, you will need to resize it to 180 X 114 pixels. Save the image as a bitmap and name it oemlogo.bmp and save it in your c:windowssystem32 folder
Next, create a notepad file, save to in the same folder and save it as oeminfo.ini Type the following in your notepad and you can customize it to suit your needs.
[General]
Manufacturer=type what you what here
Model=type what you what here
[Support Information]
line1=type what you what here
line2=type what you what here
If you need more space, just create a new line.
You could add a line that says ‘Call me at (555) 555-5555, if this computer is brought in for repairs and the owner does not match photo…’ to your PC. You could add a line that says ‘Return to owner in found…’ to your laptop. This trick is nice to know if you sell computers or just want to add a personal touch to the computer you own.